
If you often work with long documents in Word, you're probably familiar with the frustration of seeing a table row split across two pages instead of staying together. The good news is that it's a simple fix. a problem with a fairly simple solutionIt's just somewhat hidden. In this article, we'll explain step by step how to prevent Word from splitting a table row across two pages and give you some extra tips for creating your tables.
Why prevent Word from splitting a table row across two pages?

For a start, You're not the only one who wanted to prevent Word from splitting a table row across two pages. It's almost as common as wanting to eliminate annoying blank pagesYou're working on an important report or document, and suddenly you find a table split in half instead of being joined together. The top row is left alone at the bottom of a page, and the rest appears on the next. How annoying!
This happens because Word assumes that, If a row is too tall to fit the remaining space on a page, it's best to split it.However, in most cases, we prefer that the entire row be moved to the next page so that it is fully visible and easily understood.
How to prevent Word from splitting a table row across two pages
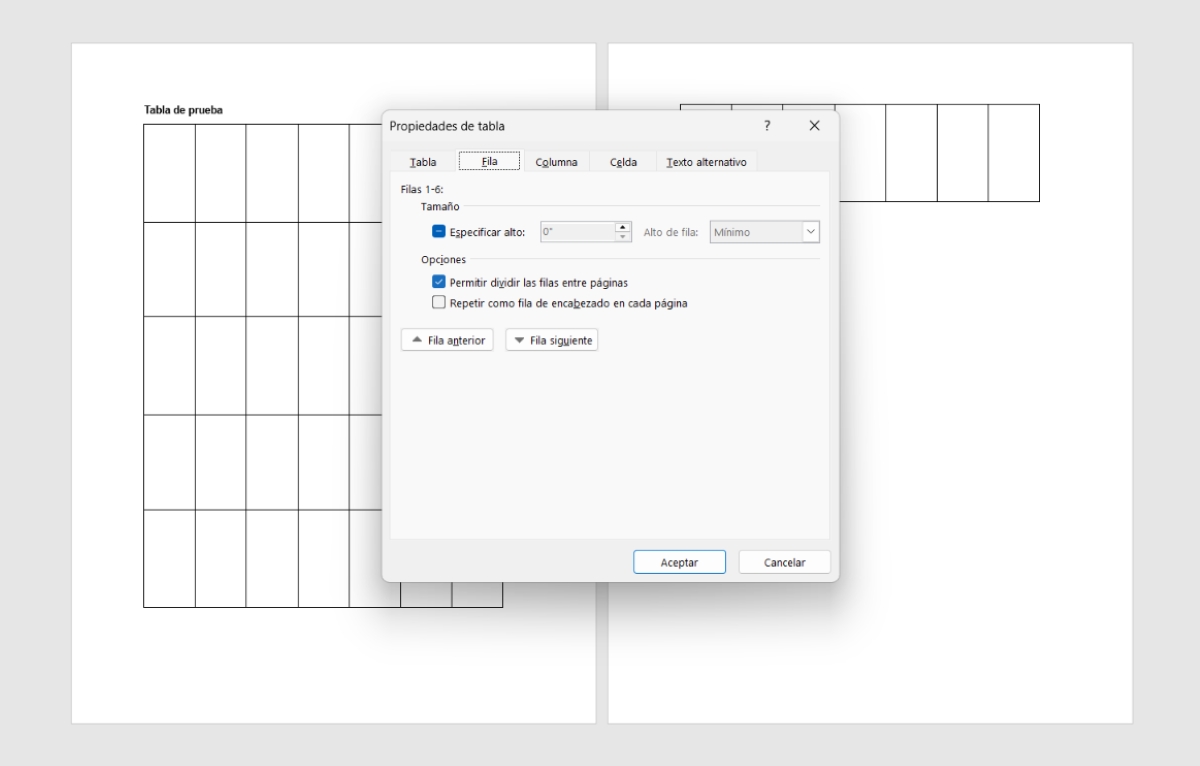
The problem is that if you leave it split, your document will look sloppy, unprofessional, and worse, difficult for anyone to read. Fortunately, fixing this is quick and easy. To do so, follow these steps. Steps to prevent Word from splitting a table row across two pages:
- Select the table or rows: Click on any cell in the table or specifically select the row or rows you want to keep complete on a single page.
- Open the table properties: Go to the Layout tab within Table Tools. Click Table Properties in the drop-down menu to open a pop-up window with configuration options.
- Uncheck the row division: In the window that appears, go to the Row tab and uncheck the box Allow rows to be split across pages.
- Apply the changes: Click OK to save the settings. Table rows will no longer be abruptly cut off. If a complete row doesn't fit in the remaining space, it will be moved to the next page, leaving a blank space on the previous page.
This method for preventing Word from splitting a table row across two pages almost always works, but It has its exceptions.If the row is taller than a full page on its own, it will obviously be split. In that case, to keep the table on a single page, the only solution is to reduce the row's content or decrease the font size.
The "Keep with the next" trick for full tables.
Sometimes the problem isn't just preventing Word from splitting a table row across two pages, but preventing the entire table from shifting. This is because sometimes the table becomes detached from the title or the preceding introduction. If you want to prevent the table from moving away from its content, there's a very useful paragraph adjustment you can apply. It consists of... Select all rows in the table except the last one.Then, do this:
- Go to the Home tab.
- Click on the "Paragraph" dialog box launcher.
- Go to the Lines and Page Breaks tab.
- Select the "Keep with next" option.
Thus, in addition to preventing a table row from persisting between two pages, you make it always remain next to the content that follows themIf the board is about to break, Word It will try to move the entire block to the next page to avoid separating it. However, it's essential that you don't select the last row, because otherwise you'll be pasting it into the following paragraph or graphic, which will create additional breaks.
One detail that goes unnoticed after preventing Word from splitting a table row across two pages: the phantom paragraph
There's another factor you're right to consider when trying to prevent Word from splitting a table row across two pages: Word automatically inserts an empty paragraph immediately after each table. (a symbol ¶)That paragraph cannot be deleted and must remain on the same page as the last row of the table. What's the problem?
If the page where your table starts doesn't have enough space to accommodate the entire table plus that invisible paragraph, Word will be forced to move at least one row to the next page so that the paragraph can fit. How can we tell if that's the problem? Press Ctrl + Shift + 8 To see the non-printing characters, look for the symbol at the end of the table. If it's alone, reduce its font size to 1 to save space and make your table fit on a single page.
Considerations for long tables spanning multiple pages
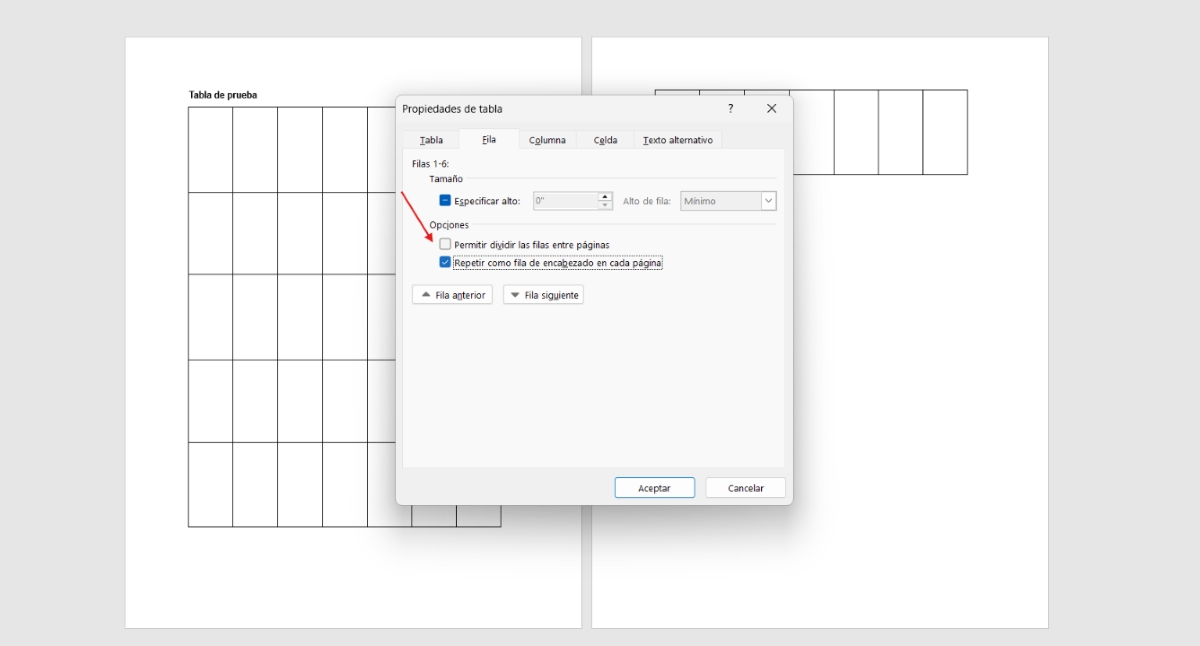
But what if your table is so long that it takes up several pages in the same document? Is it possible to prevent Word from splitting a table row across two or more pages in cases like this? Yes. But it's also important that the header row is repeated on each page so that the reader doesn't lose the context of the columns.
To do this, select the first row of your table (the one containing the column headings) and on the Table Tools Layout tab, check the option Repeat header rowsIt's important to combine this option with disabling "Allow row to split across pages." This will provide a better reading experience.
Conclusion
In conclusion, Word is a wonderful tool, but some of its automatic functions prioritize space efficiency over aesthetics and readability. Fortunately, Preventing Word from splitting a table row across two pages is quick and easy.You can also keep the table connected to its context. After making these small adjustments, you'll achieve a professional finish that will make your texts stand out.
Index
- 1 Why prevent Word from splitting a table row across two pages?
- 1.1 How to prevent Word from splitting a table row across two pages
- 1.2 The "Keep with the next" trick for full tables.
- 1.3 One detail that goes unnoticed after preventing Word from splitting a table row across two pages: the phantom paragraph
- 1.4 Considerations for long tables spanning multiple pages
- 1.5 Conclusion

From a young age, I've been fascinated by all things scientific and technological, especially those advancements that make our lives easier and more enjoyable. I love staying up-to-date on the latest news and trends, and sharing my experiences, opinions, and tips about the devices and gadgets I use. This led me to become a web writer a little over five years ago, focusing primarily on Android devices and Windows operating systems. I've learned to explain complex concepts in simple terms so my readers can easily understand them.