There are many backup applications, but few are as effective and reliable as Restic. It's open source, easy to use, and very fast for making encrypted backups and restoring themIf you're not yet familiar with this tool, keep reading to learn how to install Resti and create your first encrypted backup.
What is Resty and why should you use it?

We all know that We should make backupsBut for some reason, we always end up putting it off. Perhaps the solutions we know are complicated, expensive, or too slow. And this is where installing Restic becomes so advantageous for anyone who takes their data security seriously.
Restic is a command-line program designed to perform fast, secure, and efficient backupsIt doesn't have a graphical interface, but that shouldn't scare you. If you learn to use the few basic commands, you'll have one of the most powerful backup applications available. What makes it so special?
To begin with, Restic is distributed as a single binary with no dependencies, so It works the same on Linux, macOS, Windows, and BSD.Secondly, it does not treat security as a secondary function: applies encryption by defaultYour data is encrypted locally before leaving your computer using AES-256-CTR with Poly1305-AEC authentication. Neither your storage provider nor anyone without your password can access it.
This leads us to another advantage of installing Restic. This tool has multi-destination supportYou can save your backups locally (external drive or network folder) or directly to the cloud. Restic natively supports Amazon S3, Backblaze B2, Google Cloud Storage, Microsoft Azure Blob, OpenStack Swift, and FTP/SFTP servers. Yes, we're talking serious backups.
Install Restic: intelligent data deduplication

This is where Restic shines, and it's one of the reasons why it performs backups so quickly. The tool It divides the files into variable-sized blocks, identifying them by content.And it saves each unique block only once. That is, if you have ten copies of the same 1GB file in different locations on your disk, Restic identifies the duplicates and avoids storing them multiple times. The backup will only take up 1GB.
Naturally, the first encrypted backup you make with Restic will take a little while to complete. But after that, Restic It will only upload new or modified blocksSo subsequent backups will be drastically faster with significant storage space savings. But installing Restic has even more advantages.
For example, you can easily recover previous versions from your backup thanks to history of snapshots or snapshots that preserve the complete state of your files at the time of the backup. It's also easy to audit backups to check that they haven't been corrupted, and you can even Carry the Restic executable on a USB drive and restore your data in almost any environment. without a headache.
How to install Restic and create your first encrypted backup
Let's now see how to install Restic and create your first encrypted backup. The installation process pass through the terminal This applies to all distributions and operating systems, but it's very simple. Let's list them all:
- Ubuntu / Debian and derivatives: Execute
sudo apt updateand thensudo apt install restic. - En Arch Linux / Manjaro:
sudo pacman -S restic - En Fedora / RHEL:
sudo dnf install restic - En macOS: If you use Homebrew as your package manager, run
brew install restic - En Windows: It depends on the package manager you're using. If you're using Winget (which comes installed by default), run the following command from PowerShell.
winget install --exact --id restic.restic --scope MachineThis makes the tool immediately available in the system's PATH.
You can also install Restic by directly downloading the executable file from the official GitHub release page (Resty GitHub ReleasesExtract the files and add them to your system's environment variables. After installation, verify that the tool is working correctly. consulted version with the command restic versionIf the system returns the installed version (0.16.4 at the time of writing), you are ready to continue.
Initializing your first encrypted repository
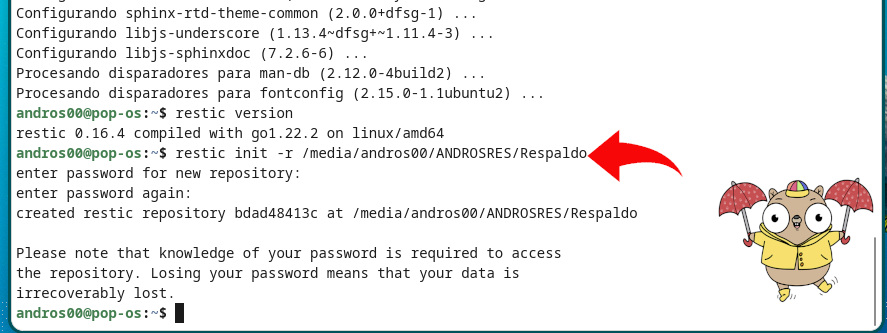
With Restic running on your system, it's time to create your first repository, that is, the directory where your backups will be storedThese can be on a local disk, a remote server, or a cloud service. For practical purposes, we'll create a local repository on an external hard drive: it's the easiest way to test Restic.
Let's begin: open the terminal and run the command restic init indicating the destination route using the parameter -rThe complete command would have the following structure: restic init -r /media/usuario/nombre de la unidad/nombre de la carpetaThe screenshot above contains an example that may clarify any doubts.
Next, Resty will ask you to enter and confirm a password for the repository. This password is used to derive the cryptographic key that protects all your data. So, if you lose it, there will be no way to recover the information. Not even the Resty developers will be able to help you. That's why, save the password in a secure password manager and in a third physical location.
Install Restic and create your first encrypted backup
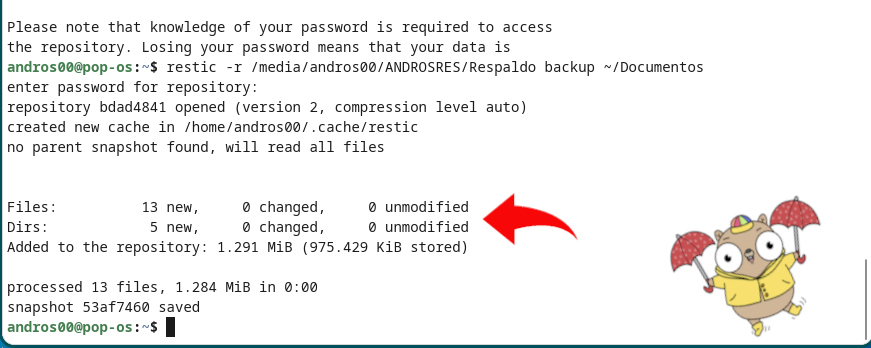
So far, installing Restic and creating a repository has been straightforward. Below, we'll see how. back up your first folder of filesLet's say you want to make an encrypted backup of the Documents folder on your main drive.
The command must First specify the repository and then the folder to back up. preceded by the command backup. So: restic -r /media/usuario/nombre de la unidad/nombre de la carpeta backup ~/DocumentosThe system will ask you to enter the repository password, after which Resti will process the files and display a real-time progress bar.
Each backup generated is known as a snapshot y It is assigned an alphanumeric ID of eight charactersIf you open your file explorer and navigate to your repository's location, you'll see several files and folders containing the encrypted data. Finally, let's see how to restore a backup using Restic.
How to restore a backup with Restic
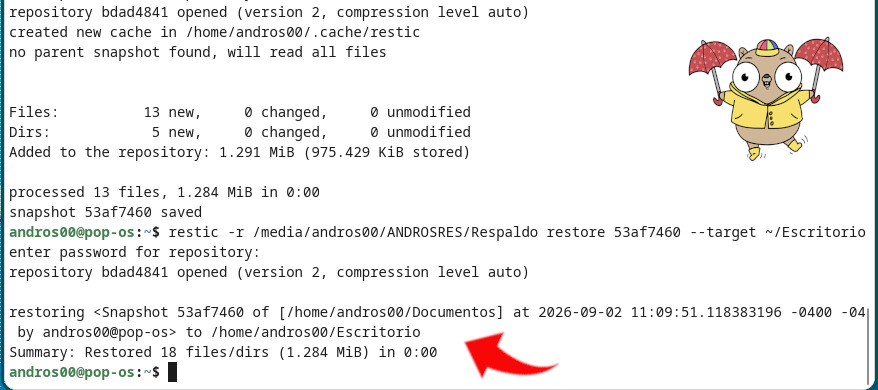
Installing Restic, creating a repository, and creating your first encrypted backup was also straightforward. And how do you restore it? That's simple too: We specify the destination directory with its ID and use the command restoreContinuing with the previous example, the command would be: restic -r /media/usuario/nombre de la unidad/nombre de la carpeta restore ID --target ~/Escritorio.
In the previous command, we asked Resti to Restore the backup using a specific ID in the Desktop Location. That's it! Now you know how to install Restic, specify a local repository, make your first encrypted backup, and restore it to a specific location. Want to learn more about Restic? Check out the posts Complete guide to incremental backups with Resti y How to restore a folder from a Restoration backup.

From a young age, I've been fascinated by all things scientific and technological, especially those advancements that make our lives easier and more enjoyable. I love staying up-to-date on the latest news and trends, and sharing my experiences, opinions, and tips about the devices and gadgets I use. This led me to become a web writer a little over five years ago, focusing primarily on Android devices and Windows operating systems. I've learned to explain complex concepts in simple terms so my readers can easily understand them.