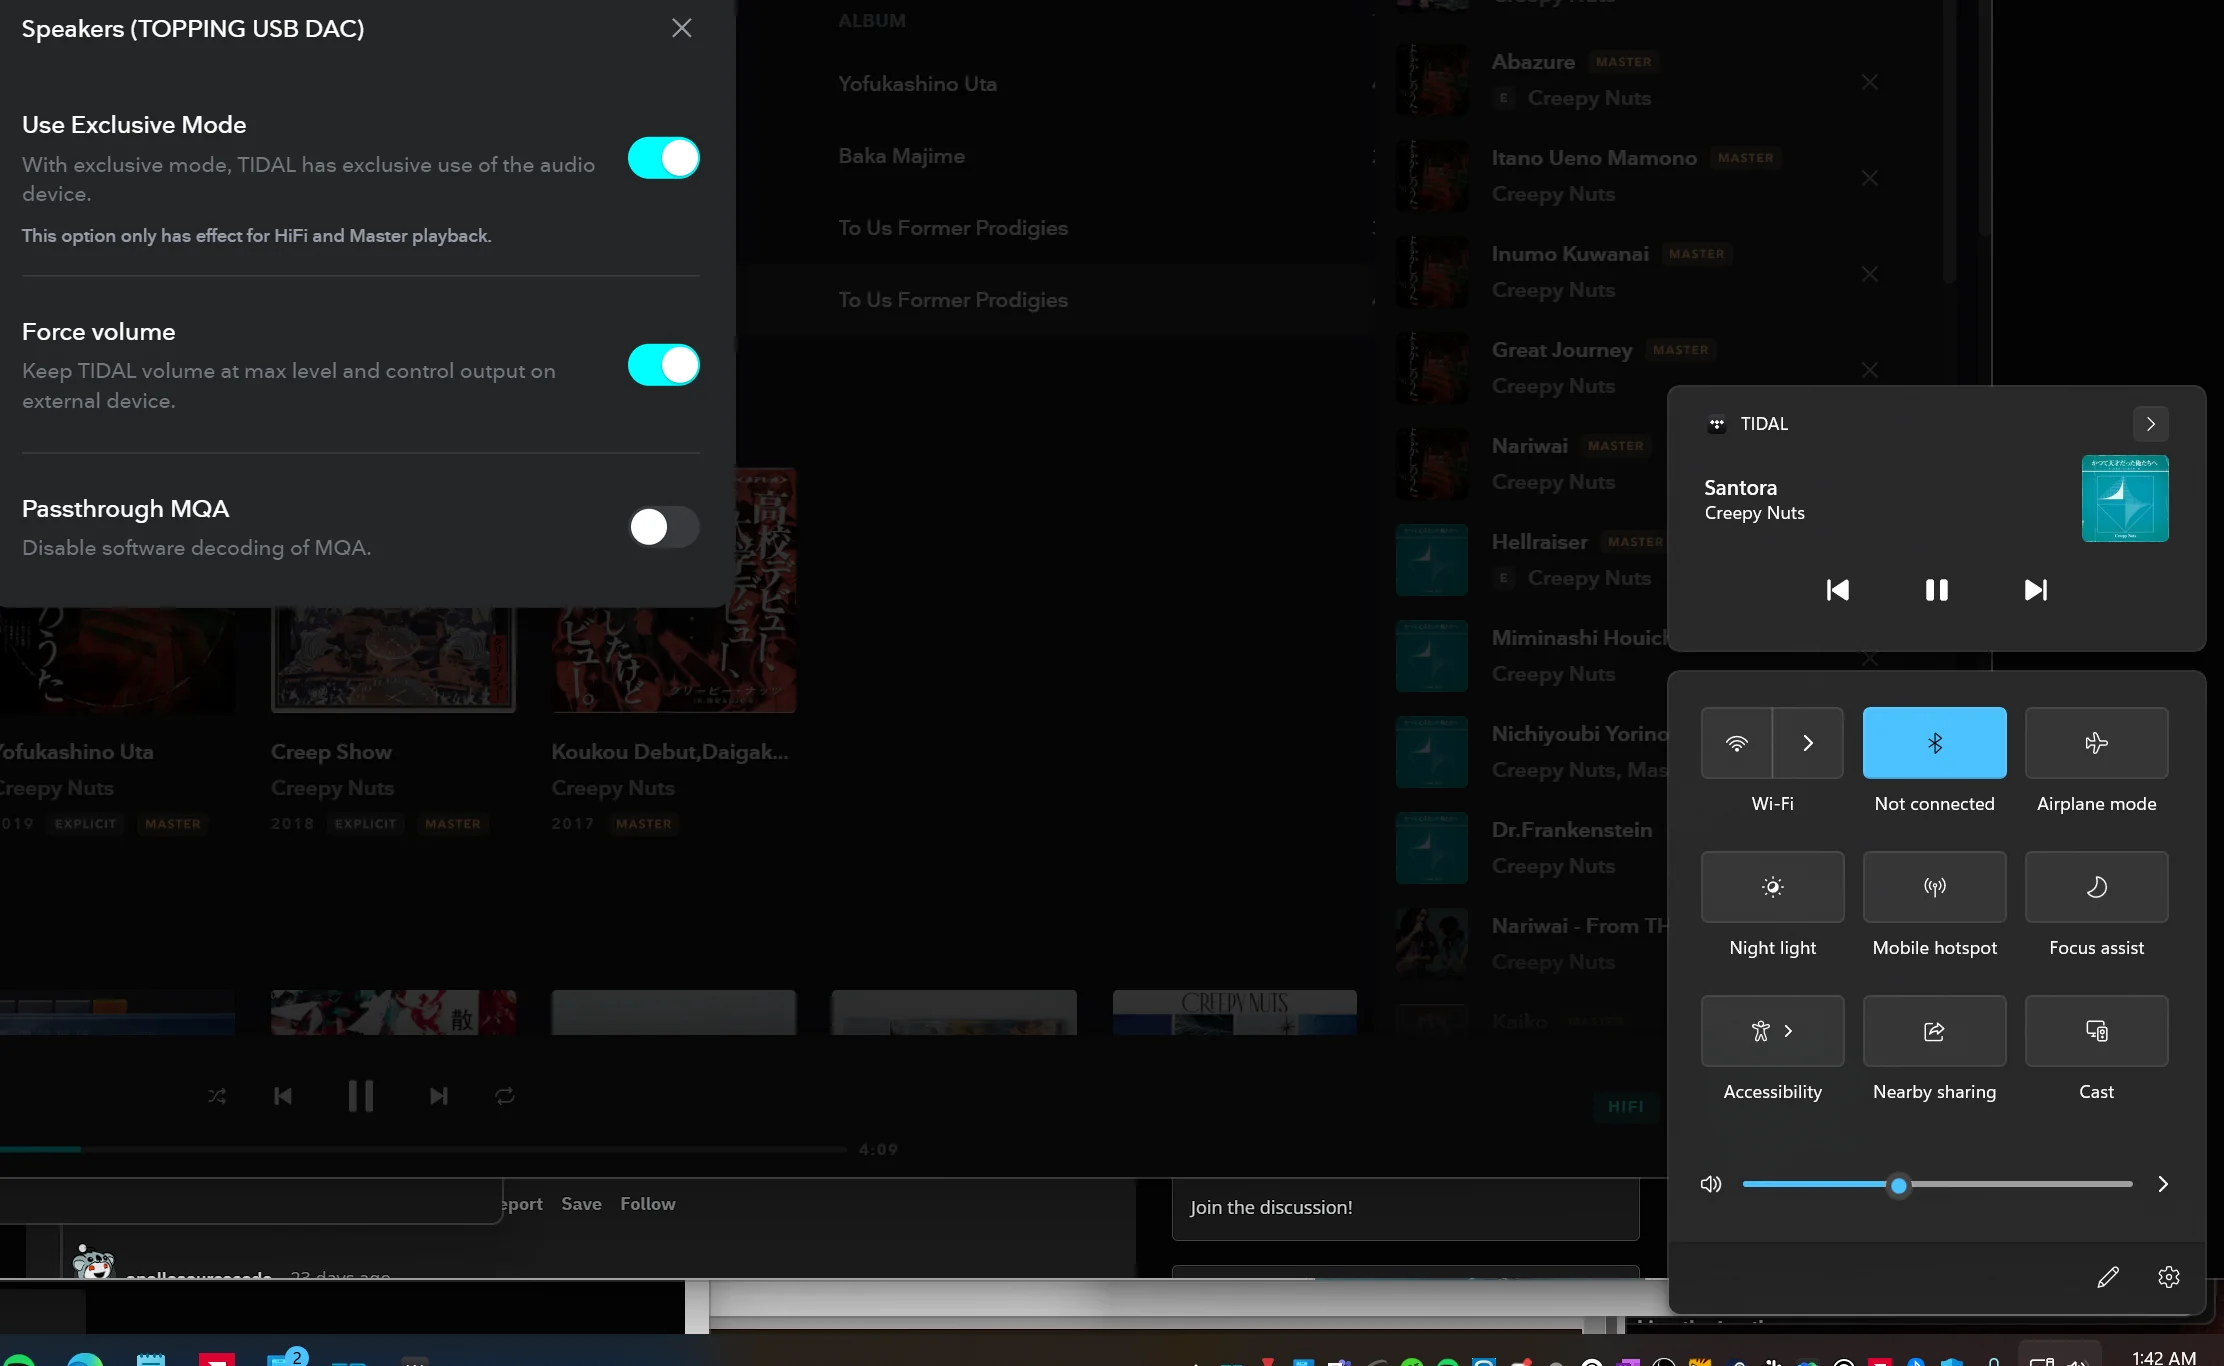
- Exclusive mode in Windows 11 allows a single application to fully control an audio device, which can improve latency and stability but prevents other apps from using that same device at the same time.
- To avoid conflicts between programs and problems with headphones or microphones, it is usually advisable to disable exclusive mode and audio enhancements in the properties of each playback and recording device.
- Tools like FlexASIO act as intermediary drivers and make it easier for various professional audio applications to share the same hardware on Windows 11 without blocking.
- Before blaming the exclusive mode, it's a good idea to check basic sound settings, default device, and use the Windows 11 audio troubleshooter to fix common errors.
Within your operating system's audio and sound options, the Exclusive Mode in Windows 11 It offers many interesting possibilities. Provided, of course, that you know how to use it properly. It's relatively easy to get lost among sound settings, drivers, strange options like "allow applications to take exclusive control," and things like ASIO or FlexASIO.
When you buy a good pair of headphones or work with audio software, you start wondering whether you should enable or disable dedicated audio mode. You wonder if you'll actually notice a difference in sound quality, or if it's just adding unnecessary hassle. If that's the case for you, you'll want to read this article.
What is Exclusive Mode in Windows 11 and what is it used for?
In Windows 11, the so-called exclusive mode of an audio device It allows a single application to capture total control of that device (headphones, speakers, interface, microphone, etc.), leaving the rest of the programs without access to that same device for the duration of exclusive use.
When an application enters exclusive mode, it can directly manage the sampling rate, bit depth, and audio stream processingThis bypasses much of the internal mixing done by the operating system. This is intended for scenarios where the lowest possible latency or the cleanest and most direct audio path possible is desired.
This behavior has a very clear effect: if one app takes exclusive control, The other applications lose sound on that specific device.That's why it's so common for music production programs, professional audio streaming software, or some advanced players to conflict with the rest of the system.
In Windows, this approach creates a fairly common problem: It's not always easy to share the same audio device between multiple applications at the same timeOften, the only stable way to work is to use a single program to manage the audio, or to disable the exclusive mode in the control panel to allow the system itself to do the mixing.
It's important to understand that exclusive mode isn't a "magic trick" to magically make the sound better, but rather a way to to cede total control to a specific application, usually looking for performance, low latency or specific compatibility with certain audio software.

Advantages and disadvantages of exclusive mode in everyday use
One of the big questions for someone starting out with quality headphones is whether There is a noticeable audible difference when you activate exclusive modeThe answer depends a lot on your usage, the software involved, and the audio device you have.
In theory, by using exclusive mode the application can send the audio to the device in the original format (without unnecessary frequency or bit depth conversions) and with a more direct path, which can avoid minor quality degradation. This is especially interesting in demanding music production or hi-fi playback environments.
However, in everyday use with Windows 11 - browsing, playing games, listening to music on streaming services, or watching videos - Many users barely notice the difference. between using exclusive mode or letting the system manage the mix in shared mode, provided the device is properly configured.
The major drawback of exclusive mode is practical: when an app takes exclusive control, Other applications lose access to the audio from that same device.This translates into very typical situations: your DAW plays sound, but the browser doesn't; or the audio player works, but your communication software doesn't emit sound.
Furthermore, there are cases where the very design of some Windows programs causes enter exclusive mode by default or manage the device in an inflexible way, causing sound blockages that don't always have a simple solution beyond disabling exclusive mode or changing software.
When is it advisable to enable exclusive mode in Windows 11?
If you primarily use Windows 11 for advanced audio tasks, you might want to keep the exclusive mode active in certain specific scenariosIt is not a mandatory option, but it is recommended in some cases.
For example, when you work with a DAW (digital audio workstation) For recording or mixing, the priority is usually the lowest possible latency and strict management of the audio device. In these situations, allowing the application to take exclusive control typically results in fewer delay and synchronization issues.
It is also common to activate exclusive mode in hi-fi oriented audio players These offer WASAPI Exclusive, ASIO, or similar modes, which aim to reproduce the file exactly as it is, avoiding automatic system resampling. If you want to listen to your tracks in the best possible technical conditions, this direct route might be worthwhile.
In the gaming sector, Windows 11 is improving many features related to performance and full-screen experiencesuch as the so-called Full Screen Experience or special settings for Windows-based handheld consoles. While not exactly the same as audio-only mode, the concept of prioritizing one resource (image, sound, controller input) is similar in spirit.
In general, it's best to use exclusive mode when you really need to. to maximize the technical quality, latency, or stability of a specific application, and accept in return that the rest of the system may be temporarily without access to that audio device.
When is it best to disable exclusive mode in Windows 11?
In many home and office settings, it is more practical Disable exclusive mode to avoid conflictsEspecially if you usually have several applications emitting sound at the same time: games, browser, communication programs, media players, etc.
A typical case is when you need your DAW and other audio software (such as Source-Connect or other remote connection tools) Use the same device at the same time. If exclusive mode is active, one of them will most likely apply a lock that leaves the other without sound.
By unchecking the exclusive control options in Windows 11, you allow the system mix the sound from multiple sources at onceby sharing the output device. This doesn't guarantee 100% compatibility with all software worldwide, but in practice it usually solves most "this program works but the other doesn't" problems.
Furthermore, there are situations where the so-called “audio enhancements” They can cause more problems than they solve: distortions, unexpected volume changes, or strange behavior in certain games and communication apps. Disabling them, along with the dedicated mode, helps create a more predictable audio environment.
If you only want to use your headphones with your computer for listen to music, watch movies, participate in video calls and play games Without complicating things, the best option is usually to keep exclusive mode disabled and let Windows mix everything in a shared mode.
How to disable exclusive audio mode in Windows 11 step by step
Windows 11 has slightly changed how you access sound settings compared to previous versions, but the classic method still exists. Sound control panel with Playback and Recording tabs where the devices are thoroughly managed.
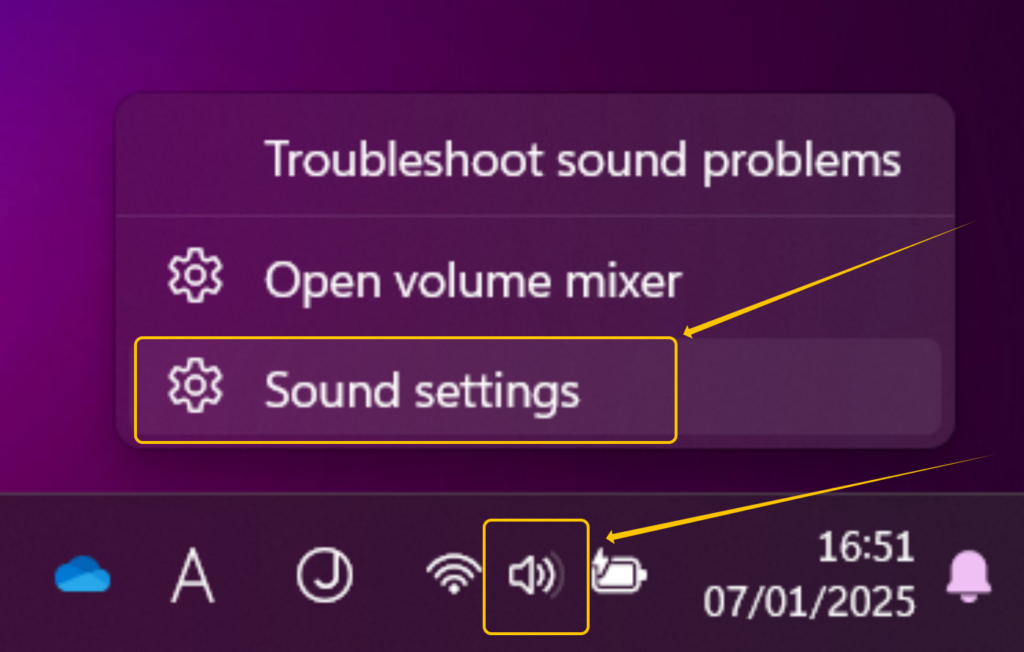
To access the exclusive mode options, the easiest way nowadays is to use the search bar. In the Windows search box, type “Sound settings” and open the result that takes you to the Settings panel within the System > Sound category.
Within that screen, on the right side or at the bottom, you will find a link called “Sound control panel” or “More sound settings.” Clicking it will open the classic Sound window with the Playback, Recording, Sounds, and Communications tabs.
In the Playback tab, you'll see a list of all available output devices (speakers, headphones, HDMI outputs, interfaces, etc.). The Recording tab will display the microphones, line inputs, and other capture devices configured in your system.
To properly disable exclusive mode, it is very important that Repeat the process on both tabs and on all devices you regularly use.because Windows manages exclusive control per device, not globally.

Detailed configuration of the exclusive mode on each device
Once you have the classic Sound window open, in the Playback tab select your main output device (e.g., Headphones or Speakers) and click the Properties button. This will open another window with several tabs for settings specific to that device.
Within the device properties, look for the tab called "Advanced"This is where Windows groups the options related to the default format (sampling rate and bit depth) and the possibilities for exclusive control.
In the Exclusive Mode section you will usually see a box like this: “Allow apps to take exclusive control of this device”If you uncheck this option, you are telling the system that no application can exclusively lock the device.
Some systems also display another related option, such as allowing applications in priority mode or similar. To avoid conflicts, it is recommended to... Leave all boxes related to exclusive use uncheckedunless you know exactly which application needs that function.
After changing these options, click Apply and then OK to save the settings. Then, return to the Sound window and Repeat the same process with the rest of the playback devices that you use, to ensure that none of them are unexpectedly locked into exclusive mode.
Having done this, it's advisable to do the same in the Recording tab: select each microphone or interface, go to Properties, Advanced tab, and Uncheck the exclusive control options on the input devicesThis is key if you want to use the same microphone with multiple applications simultaneously.
Simultaneous use of multiple programs: DAW, Source-Connect and more
One of the most problematic cases in Windows is when you want to use the same audio device on two demanding programs at the same timeFor example, a DAW for recording and mixing, and a remote connection tool like Source-Connect for real-time collaboration.
Many professional audio applications attempt to take exclusive control of the sound interface to ensure the best possible latency and stability, which makes the rest of the programs will lose access to the same deviceThis often causes one application to stop playing or recording as soon as the other is opened.
Disabling exclusive mode in the device properties usually helps Windows to Share entries and exits between multiple appsBut that's not always enough, because some programs rely on specific drivers and access models that don't cooperate well with the shared system mix.
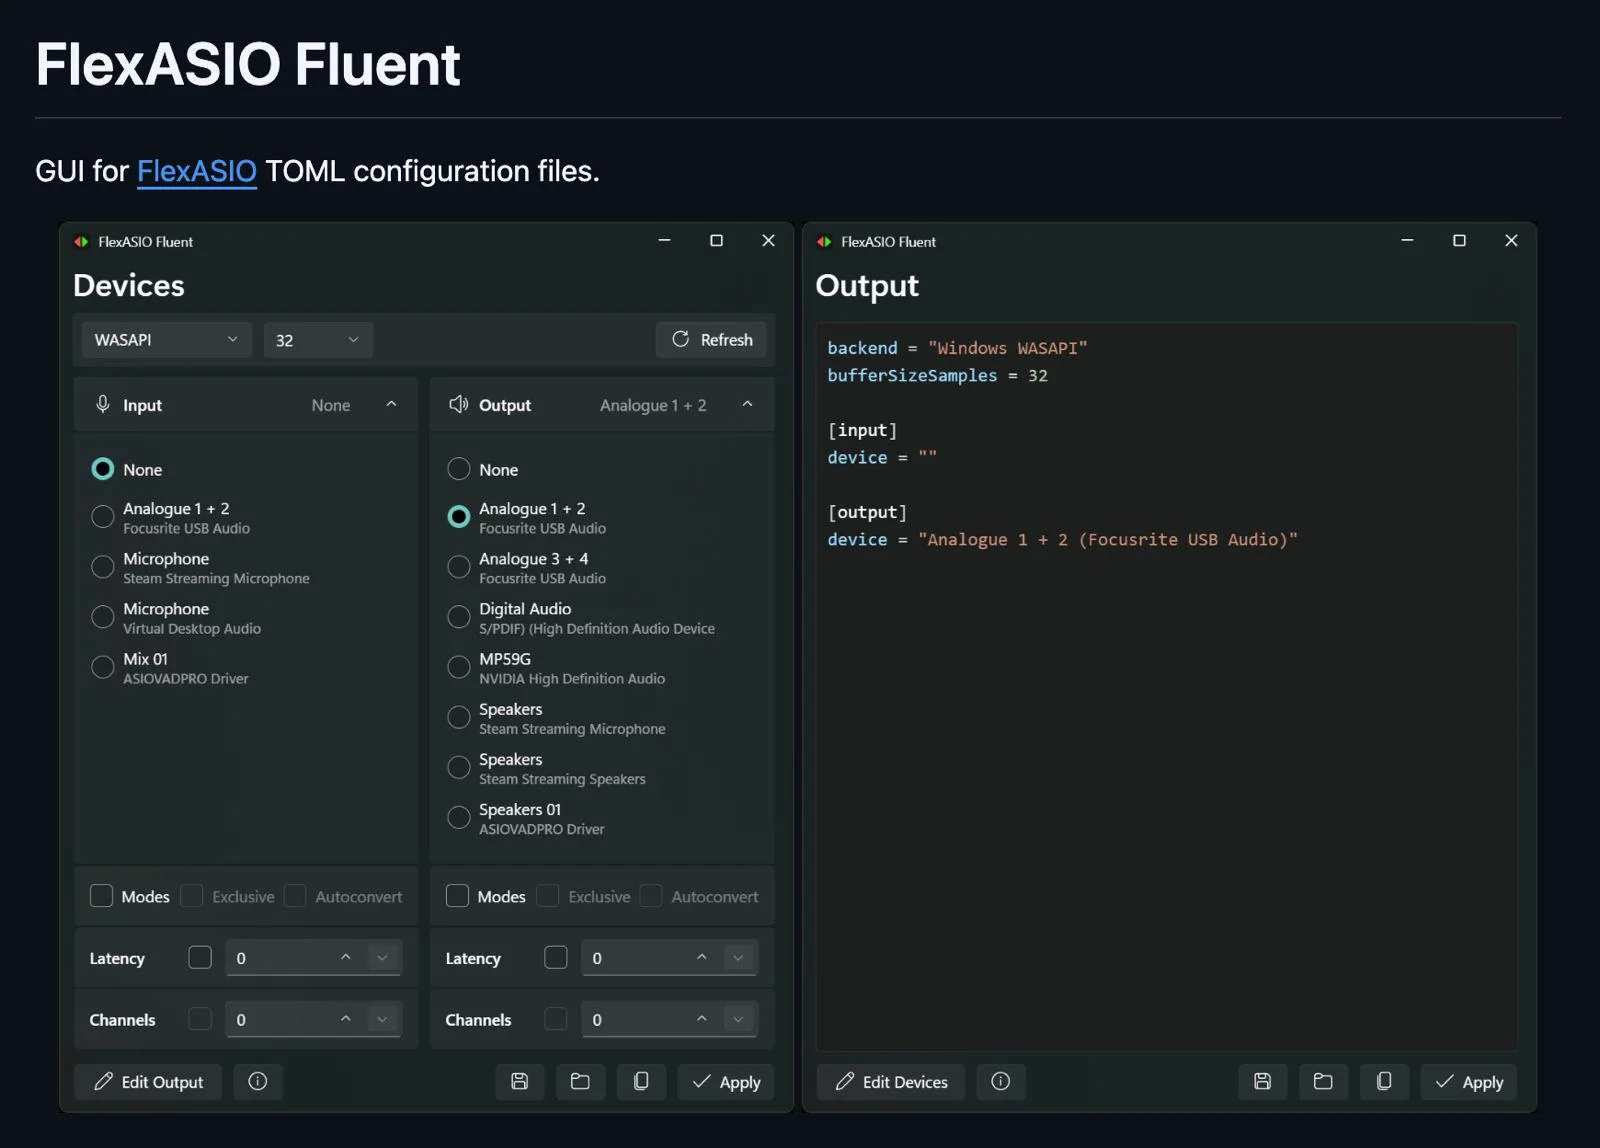
In these situations, one of the few viable options is to use an intermediate controller such as FlexASIOwhich acts as a "virtual layer" over the audio hardware and allows different applications to use it with greater flexibility.
FlexASIO is not tied to any specific card or interface, but rather acts as Universal ASIO driver capable of utilizing the system's default inputs and outputsIn this way, it becomes a kind of bridge between your audio programs and the actual device configured in Windows.
How to use FlexASIO as a workaround in Windows 11
If you need to share your microphone or interface between several applications that would normally monopolize the device, install FlexASIO can solve most problemsespecially when combining DAWs with remote connection or streaming tools.
The first step is to download the latest version of the driver from its official GitHub page, specifically in the section of FlexASIO project releasesOnce you have downloaded the installer, run it and complete the installation process as with any other Windows program.
After installation, make sure that in Windows 11 you have configured as default input and output devices those you actually want to use (for example, your USB interface or your main microphone), since FlexASIO relies on those default system settings to provide its channels.
Next, open the application you want to configure, for example, Source-Connect. In its audio settings panel, select it as the input driver. FlexASIO “Input 0” and as FlexASIO outputs “Output 0 and 1”. In this way, the application will work through the universal driver, while the actual hardware will remain the one you chose in Windows.
This approach allows you, in many cases, to Run your DAW and Source-Connect simultaneously on the same hardwareThis reduces exclusive lock conflicts. However, there may always be specific cases where it's necessary to review the configuration in more detail or contact the software's support team.
Disable exclusive mode and audio enhancements to avoid conflicts
As we've seen, the exclusive mode and audio enhancements may be responsible for the fact that Headphones might work well in one application but poorly or not at all in others.If you suspect this is your case, the quickest solution is to disable both things to see if the problem disappears.
From the Sound Settings, go back into More sound settings To open the classic window, on the Playback tab, right-click on your headphones and select Properties to access device-specific settings.
On the Advanced tab, locate the section where the checkboxes are grouped. Exclusive control and audio enhancementsUncheck “Allow apps to take exclusive control of this device” and, if it appears, “Enable audio enhancements” or any similar option that applies processing effects.
Once you've modified these options, tap OK to save the changes. Test your headphones again with several different apps to see if they now work. They can all play audio without blocking each other. or without suffering rare cuts and distortions.
If you continue to experience any unusual behavior, repeat the same procedure with any other input or output devices you use and ensure that There are no devices with active exclusive control left. that may be indirectly interfering with the rest.
Using the Windows 11 Audio Troubleshooter
When none of the above solves the situation, Windows 11 includes a sound troubleshooter which can automatically detect and correct certain configuration or driver errors that are not obvious at first glance.
To run it, right-click the Start button, open the Settings app, and go to the System section. Then, go to the section... Solve problems and then in “Other problem solvers” to see the full list of available assistants.
In that list you will find an entry related to audio, usually labeled as “Audio” or “Audio Playback”Click the Run button next to it to start the built-in Windows 11 wizard.
The system will open the Get Help app and ask for permission to diagnose and repair possible sound errorsAccept and let the analysis complete. Depending on its findings, it may suggest changes to device settings, reinstall drivers, or correct configuration parameters.
Follow the on-screen instructions and check, at the end, if your headphones or audio devices They now work correctly in all applications that you need to use on a daily basis.
Knowing what Windows 11's exclusive mode actually does, in what cases it provides value, and when it's best to disable it, makes it much easier to find a balance between audio quality, compatibility and ease of use, avoiding many of the typical problems that cause so many headaches for those starting out in high fidelity audio or music production from the PC.

Editor specialized in technology and internet issues with more than ten years of experience in different digital media. I have worked as an editor and content creator for e-commerce, communication, online marketing and advertising companies. I have also written on economics, finance and other sectors websites. My work is also my passion. Now, through my articles in Tecnobits, I try to explore all the news and new opportunities that the world of technology offers us every day to improve our lives.