- HDR on monitors with low brightness and contrast can raise blacks; a well-tuned SDR sometimes looks better.
- The Windows HDR Calibration (HGIG) app reliably fixes blacks, whites, and peak brightness.
- Windows does tone mapping on the GPU and prioritizes Dolby Vision if available.
- Some monitors limit brightness in DV/DisplayHDR; a non-certified HDR10 mode may unlock more nits with less accuracy.

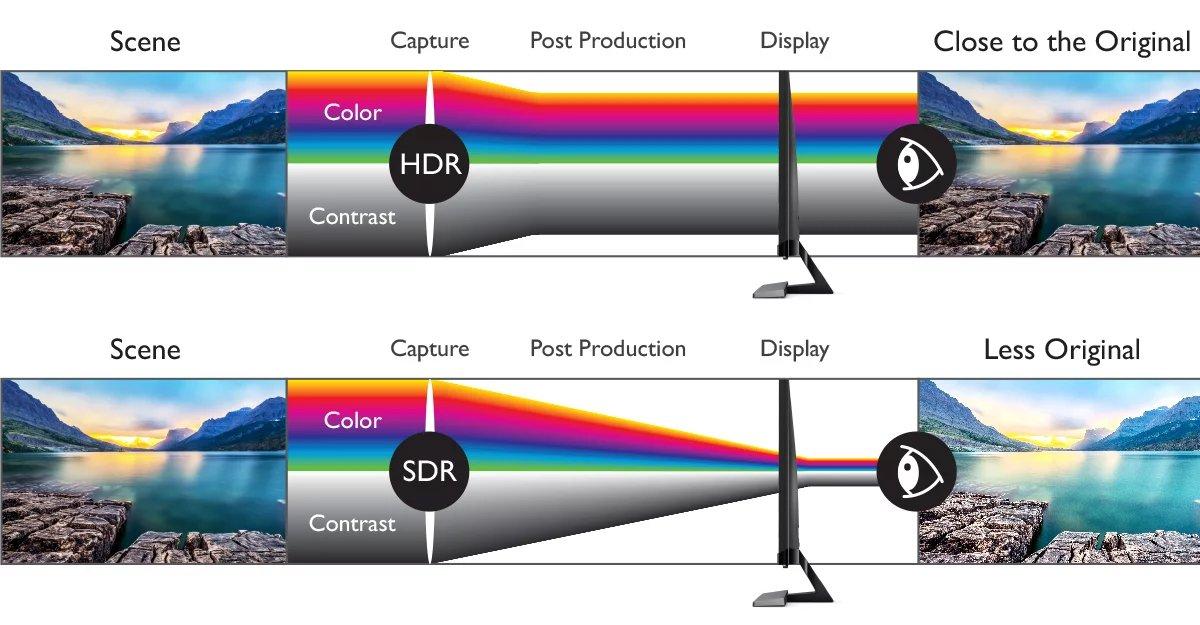
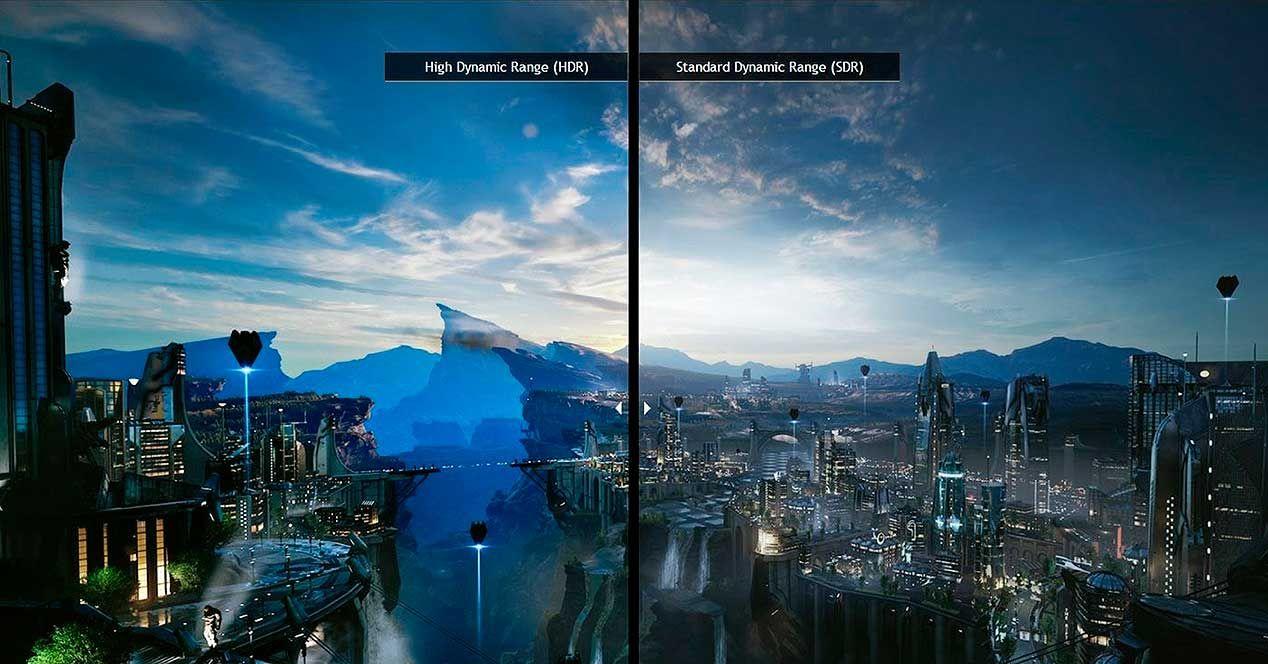
It may sound counterintuitive to you, but Not everything labeled HDR offers a better image than SDR.Depending on the panel, its maximum brightness, native contrast, or whether it has local dimming, enabling high dynamic range can give you a flatter or, downright, less enjoyable experience. And yet, there are specific scenarios where HDR makes up for it, even on modest monitors.
In this guide we are going to squeeze that idea: When to disable HDR, when to keep it, and how to properly calibrate it in Windows to get the most out of it without sacrificing blacks, shadow detail, or color accuracy. We'll cover real-world gaming experiences and the official workflow with the Windows HDR Calibration app, plus a key point: how Windows handles Dolby Vision and DisplayHDR.
When can your monitor's HDR be worse than SDR?
The HDR label alone does not guarantee miracles.Many desktop monitors boast "HDR support," but fall short on essential parameters for convincing HDR: low sustained brightness, peaks below 400 nits, a native contrast ratio of around 1000:1, and no zonal local dimming (FALD) or miniLED. In that combination, the actual dynamic range you can display is limited.
An illustrative case is that of a 27-inch IPS panel with vibrant colors, but contrast of ~1000:1 and brightness less than 400 nitsIn situations like this, enabling HDR can force the backlight to its maximum, thereby raising the perceived black level. The result? Washier blacks, less dazzling lights, and a less deep overall feel than with SDR properly adjusted.
However, positive scenarios have also been observed: with HDR active and backlight at maximum, Details previously hidden in shadows and highlights emerge In titles like Forza Horizon 4, Black Ops Cold War, and Monster Hunter: World, tone mapping can restore texture in areas that in SDR simply appear as dark or white masses with no information.
To decide, a useful technique is to compare identical scenes with fixed exposure photosThis way, you avoid the need for your eye to auto-adjust, and you can clearly see whether you've gained real detail or just increased overall brightness. Doing this with the SDR set to your preferred backlight level (for example, 50%) and also with the SDR set to maximum backlight will allow you to assess the trade-off between deep blacks and extreme detail.
In practical tests, against an SDR with the backlight at 50%, HDR with maximum backlight offered more vivid colors and extra micro detail, sacrificing some black depth. For many, this moderate loss is offset by the added definition in shadows and specular highlights; others will prefer the more contrasty look of SDR with lower backlighting. There's no single right answer: it depends on the content, the panel, and your priorities.
When to disable it without regrets? If your monitor limits the brightness, It does not have local dimming, its contrast is low If you notice abnormally high blacks, washed-out colors, or a look that doesn't quite work for you, try returning to SDR and fine-tuning the backlight level, gamma, and white balance. In night scenes and dark games, a well-tuned SDR can look more natural and have more believable blacks.
And when should you leave it active? In titles with well-implemented HDR and frequent light peaks (skies, reflections, fire), HDR mode can recover texture in highlights and shadows even on discrete monitors. If you also like a brighter, more colorful profile, that extra boost from HDR, despite the slight washout of blacks, can make all the difference and make the image more striking.
Beware of common behavior: When activating HDR, many monitors force the backlight to 100%.This may slightly raise the black level, but it also raises the brightness ceiling for the brightest whites. If your panel behaves this way and you find it too aggressive, consider using HDR only in games and movies that take advantage of it, and leave SDR for desktop or SDR content, where the flatter look may be less tiring.
A practical note: if you don't see any clear differences when you activate HDR, Don't assume your monitor's HDR is useless.The content may not be in true HDR, the platform may be handling it as expanded SDR, or calibration may be missing. Hence, the next step is key: adjusting the method in Windows makes all the difference.
Calibrate it for real on Windows: steps, requirements, and tricks

Microsoft offers an official tool to attack the problem methodically: the Windows HDR Calibration appIts goal is to improve color accuracy, visual consistency, and allow you to customize the saturation of both HDR and SDR content when HDR is active. It's especially useful for gaming, where the HGIG defines standardized test patterns.
Where to get it? Download it from the Microsoft StoreThe app works in full screen and uses three patterns recommended by the HGIG group to determine: the darkest visible detail, the brightest visible detail, and the maximum screen brightness. These three settings nail the base tone mapping so that HDR content doesn't blow out shadows or burn out highlights.
Before you start, check that you meet the requirements. The app is for Windows 11, you'll need an HDR-compatible display (built-in or external), HDR enabled in system settings, a WDDM 2.7 or higher display driver, and a relatively recent GPU (required for saturation control to work properly). Keeping Windows and your graphics drivers up to date helps avoid any surprises.
Enable HDR on your system from the display menu in Windows settings (Start → Settings → System → Display → HDR). If you use multiple screensMake sure the HDR Calibration window is set to the HDR display you're adjusting. Otherwise, the patterns won't have the desired effect, and the results will be erratic.
How to use the Windows HDR Calibration app step by step
Once installed, open the app from Start → All apps → Windows HDR Calibration. The tool will guide you through three patterns:
- Darker black pattern visible: Move the slider until the pattern disappears completely. If you still see it, you're still leaving detail beneath the black; if you go too far, you'll crush shadows.
- Brightest white pattern visible: Again, drag the slider until the pattern is no longer visible. Here, you calibrate the ceiling without clipping the highlights.
- Maximum brightness test: Determines the actual peak of your panel so that tone mapping respects the hardware and doesn't overthink it.
The app then lets you adjust the color saturation for both HDR and SDR content when the system's HDR is active. The effect can be subtle and depends on the display: increase it moderately, as going too high creates an artificial look, with overly intense fur and vegetation.
Requirements and recommendations to take into account
- Windows 11 and compatible HDR display (built-in or external).
- HDR enabled in the system display settings.
- App in full screen during calibration, on the correct HDR display.
- Recent GPU and WDDM driver 2.7 or later. Update drivers via Windows Update or the manufacturer's website.
Some HDR-certified displays usually come pretty good out of the box, but It's still worth checking out the app.. It will help you better match YOUR unit's actual black point and brightness ceiling to YOUR environment. And that brings us to another crucial tip: calibrate under the same light conditions where you usually use the monitor. If you play at night in a dark room and then play in broad daylight, the perception will change.
If the app doesn't behave as you expect, check your monitor's OSD: some activate post-processing By default, this interferes (dynamic contrast enhancement, vivid modes, etc.). Disable them for a consistent calibration. Don't get too hung up on Before/After comparisons: In certain panels the apparent differences are subtle, although underneath it is optimizing tone mapping.
Have you regretted a profile you created? You can delete color profiles from the Color Management section of the Control Panel. Go in, go to the "All Profiles" tab, select the one you want to remove, and press Remove. And every time you switch screens or tap the video channel, repeat the calibration; small physical changes alter the optimal fit.
DisplayHDR, Dolby Vision, and what Windows actually does

If your monitor claims support for both VESA DisplayHDR and Dolby Vision, you may be wondering which one to use. Windows automatically selects Dolby Vision when available, largely because it's considered a superset of DisplayHDR's certification guarantees. That said, the key lies in how Windows handles tone mapping.
On the Windows desktop, Tone mapping is done on the GPU using the color information reported by the monitor. This occurs before compositing the final desktop image, which may combine windows with different color spaces, and is applied using content-specific metadata (e.g., HDR10 with static metadata). In this workflow, the monitor is not expected to add an additional tone mapping per content when in DisplayHDR or Dolby Vision mode.
This is true whether the content is displayed maximized or not. On other platforms, the approach may be different and delegate more mapping work to the monitor itself. So, if you're coming from a console or external player, don't be surprised if the same screen looks different with Windows.
A nuance that interests those who pursue brightness at all costs: there are monitors that limit their peak to ~450 nits in Dolby Vision or DisplayHDR modesIn some cases, the OSD menu includes an option to activate an "uncertified" HDR10 mode that unlocks peaks of up to 1000 nits. The catch? It usually means sacrificing some color accuracy and other certification guarantees.
If you prefer that more forceful profile, You can access non-certified mode by disabling Dolby Vision in the OSD, assuming the trade-off: more brightness in exchange for potentially less accurate reproduction. Evaluate it with your usual content, and if you're not satisfied, return to certified mode and recalibrate with the Windows app.
Quick tips for deciding between HDR and SDR in everyday life
- Games with good HDR: Use HDR, calibrate with the Windows app and, if your monitor forces backlight to 100%, accept the slight lifting of blacks if the detail gained compensates and apply tips for Reduce input lag in Windows 11.
- Desktop, web and SDRWith the system HDR ON, carefully adjust the SDR saturation in the app. If you're not happy with the overall look, work in pure SDR.
- HDR Movies: It depends on the player and how Windows handles the signal path. Try both and choose the one that provides the most detail without halos or washout.
- Modest panels (≈1000:1, <400 nits): A well-adjusted SDR can look more natural in dark scenes. HDR can be used to recover micro-detail in specific titles.
- If you are a video game player, this article may be helpful: How to reduce input lag in Windows 11 for better gaming
Returning to the practical gaming experience, compare HDR with SDR at maximum backlight It shows significant differences in favor of HDR in the resolution of details in shadows and highlights. Comparing it to SDR at a more moderate backlight (e.g., 50/100) can favor the perception of deeper blacks and more accurate colors in SDR. Your final choice is a balance between those two approaches.
If you go for HDR, assume that on many monitors the colors will appear more vibrant due to the higher backlight level. It's not bad per se, but try not to push the app's extra saturation to the point of breaking the natural look. And remember: if Windows HDR leaves you with a dull desktop, you can use it only for games and disable it for work.
Finally, don't forget that calibration does not work miraclesIf your hardware isn't up to scratch, adjusting patterns will get you closer to its best version, but it won't turn an SDR panel labeled HDR into a miniLED TV. Still, with the right method and realistic expectations, you can eke out a significant amount of visible improvements and make informed decisions for each scenario.
Choose HDR or SDR based on the content, panel, and your taste, calibrate with the official app to set blacks, whites, and peak brightness, and understand how Windows handles Dolby Vision and DisplayHDR to avoid surprises. Whether you want to rescue extreme detail or preserve deeper blacks is the choice that truly defines your daily experience.
Passionate about technology since he was little. I love being up to date in the sector and, above all, communicating it. That is why I have been dedicated to communication on technology and video game websites for many years. You can find me writing about Android, Windows, MacOS, iOS, Nintendo or any other related topic that comes to mind.

