- UEFI/Legacy consistency with correct GPT/MBR and boot order prevents most crashes.
- Repairing the bootloader with bootrec and recreating the EFI with bcdboot is usually definitive.
- In SATA→NVMe, Safe Mode helps load drivers and complete the migration.
- If cloning failed, re-clone properly or install clean for a solid and fast boot.
Have you cloned your Windows to an NVMe and it doesn't start? This is a common issue when migrating from a SATA HDD/SSD to an M.2 NVMe or when changing from MBR to GPT without aligning the boot mode. In many cases, the system still relies on the old drive's boot loader. In these cases, it's necessary to repair BCD/EFI and align partitions.
In this guide you will find All the common causes and step-by-step solutions: from checking the connection and boot order in BIOS/UEFI, to rebuilding the BCD, recreating the EFI partition with bcdboot, activating the system partition in MBR, booting into safe mode to install NVMe drivers, and even when it is convenient reclone or do a clean installWe've also added practical tips from forums and manufacturers so you don't miss a thing.
Typical causes: why a cloned NVMe device won't boot
Before touching anything, it is important to understand the reason. The most common causes after cloning they are:
- The SSD/NVMe is connected as external (USB/enclosure). Many cloning devices don't allow this drive to be booted via USB; connect it via SATA or to the corresponding M.2 slot.
- Not set as first boot deviceIf the BIOS/UEFI continues to prioritize the old drive, the system will never attempt to boot from the new one.
- Boot mode incompatibility (UEFI vs. Legacy/CSM). A GPT disk requires UEFI; an MBR disk requires Legacy. Mixing them causes boot failures.
- Incomplete or interrupted cloning; boot partitions (EFI/MSR/Reserved) are missing or the BCD is corrupted.
- The manager is on another diskIt's common for the EFI/manager partition to be on a different SSD/HDD, and after cloning, the computer continues to "look" for it there.
- Missing drivers (especially when moving from SATA to NVMe). Boot into Safe Mode usually forces its installation.
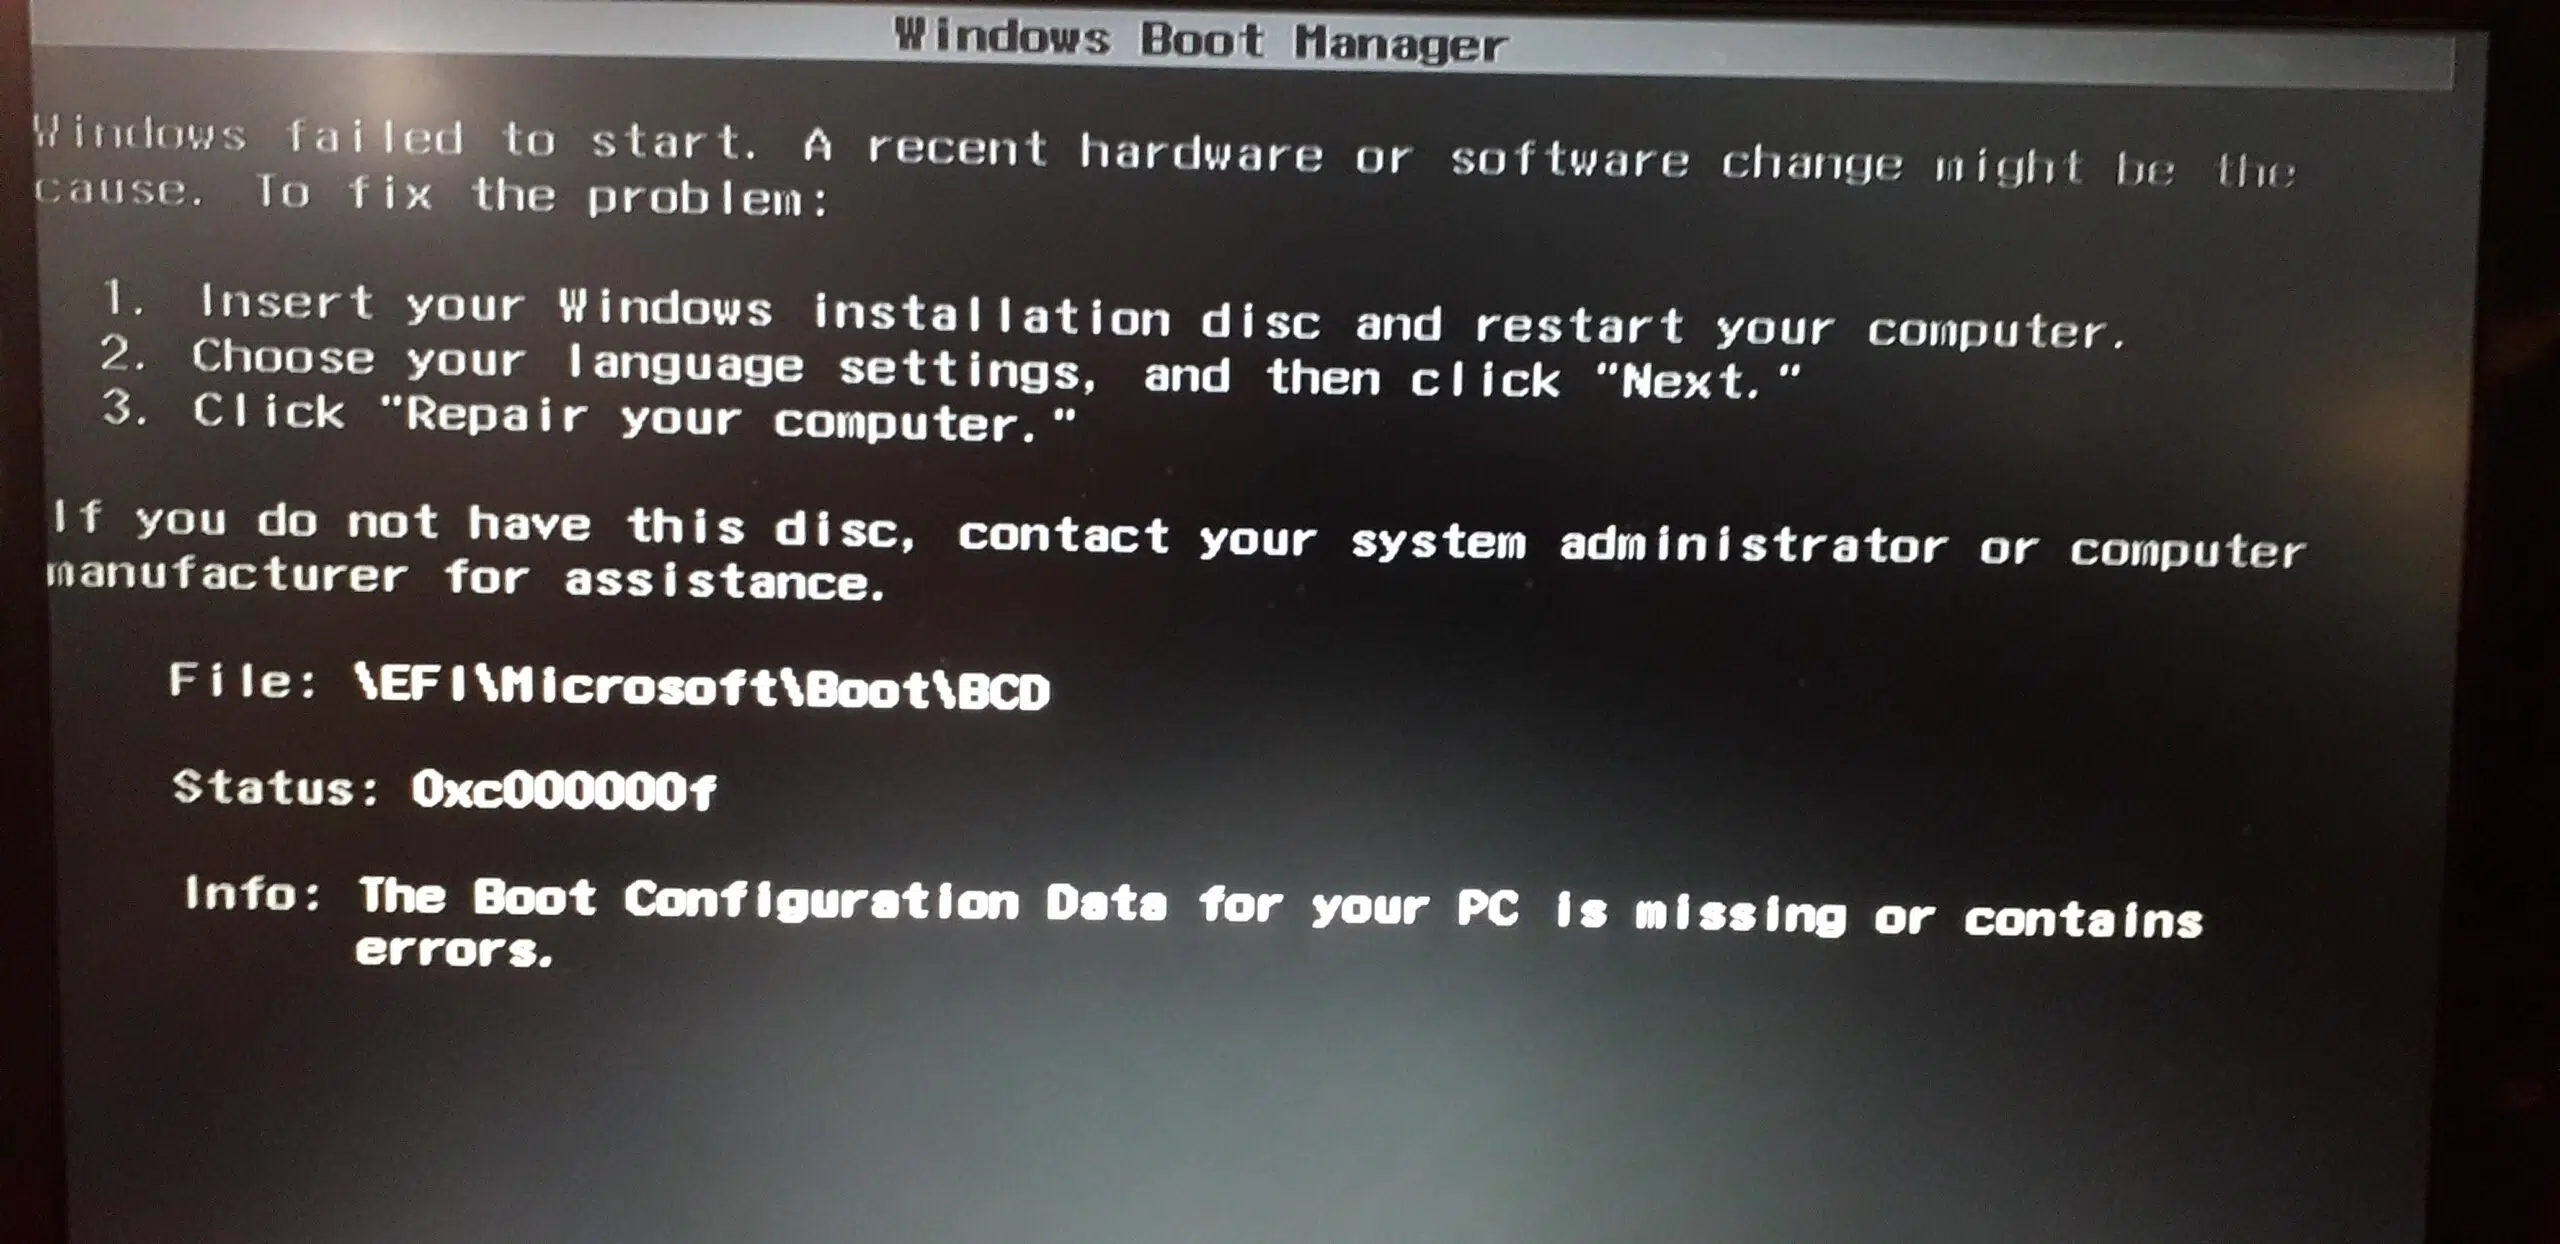
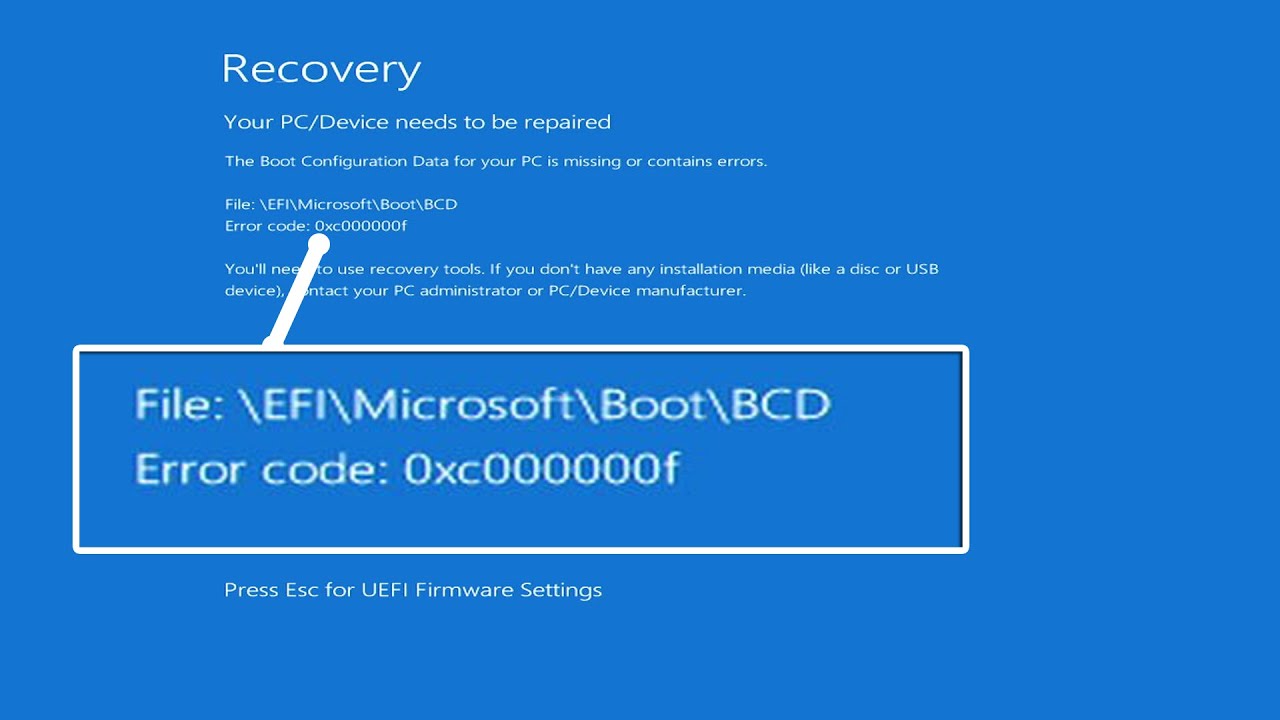
In addition, the error may appear winload.efi is missing or corrupted (0xc000000e, 0xc000000f, 0xc0000428…), an indication of a broken BCD, a non-existent EFI or a UEFI/Secure Boot incorrectly configured.
UEFI vs. Legacy and GPT vs. MBR: Compatibility matters
Here's a big part of the gist. A record in GPT requires UEFI; a disc in MBR requires Legacy/CSMIf you clone a GPT system to GPT but the motherboard is in Legacy, it won't boot. And vice versa, if your clone is MBR and you force pure UEFI, it won't boot either. Change the boot mode to match, and remember that in GPT There is no “Active” brand; that flag only applies to MBR.
Be careful with mixed boards and scenarios: it's possible that your original MBR installation worked in Legacy, you cloned to an NVMe GPT, and by not switching the board to UEFI the computer doesn't see the bootloader. Switch to UEFI If your destination disk is GPT. And if the computer does not support UEFI, then clone to MBR or convert to MBR before booting (you will lose advantages such as large partitions and more than 4 primary partitions).
Key partitions: EFI in GPT and “Active” in MBR
On GPT disks, Windows boots from a EFI System Partition (ESP) formatted in FAT32 with the boot files (bootx64.efi, BCD, etc.). If cloning did not copy the ESP, you must recreate the EFI and populate it. On MBR disks, the system partition must be marked as Active for the firmware (Legacy) to find it; learn how to make the SSD the primary drive in Windows 11 if you need to adjust this.
A common mistake: having the ESP on another disc (for example, a small 250 GB SSD) and after cloning C:, the computer continues to depend on that foreign ESP. The solution: create a new ESP on NVMe, generate the boot files on it and point the BIOS to that disk, removing or disconnecting the others during the repair to avoid ambiguities.
Repair BCD/EFI from Windows Recovery Environment
Standard and very effective procedure. You need a Windows installation USB (you can create it from the official tool), boot from it and choose Repair your computer → Troubleshoot → Advanced options → System symbolFrom there you have several routes.
Route A: Rebuild BCD (fast)
1) Run these commands in order (change letter if applicable):
bootrec /fixmbr bcdedit /export c:\bcdbackup attrib c:\boot\bcd -h -r -s ren c:\boot\bcd bcd.old bootrec /rebuildbcd
If it detects installations (for example, C:\Windows) and asks you, answers S (or Y). This regenerates the BCD store. Exit with exit and reboot to test.
Path B: Recreate the EFI with diskpart + bcdboot
When the EFI partition does not exist or is empty/corrupt, this path is the safest. Assign a letter to the ESP and repopulates:
diskpart list volume select volume = n (n = volume of the EFI/“System” partition) assign letter = M exit bcdboot C:\Windows /s M: /f UEFI
This copies the boot files from C:\Windows to the ESP (M:) and registers them for UEFI. Restart and check. If you still have Secure Boot enabled and it won't boot, temporarily disable it in the BIOS.
Path C: Repair system files and advanced BCD
If you suspect corruption, execute sfcIn WinRE environment it is advisable to run the analysis offline:
bcdedit /enum | find "osdevice" sfc /scannow /OFFBOOTDIR=C:\ /OFFWINDIR=C:\Windows
Furthermore, if bootrec does not solve, you can force routes in BCD with:
bcdedit /set {bootmgr} device boot bcdedit /set {default} device boot bcdedit /set {default} osdevice boot bcdedit /set {default} device partition=C: bcdedit /set {default} osdevice partition=C: bcdedit /set {default} path \Windows\System32\winload.efi
Disable Secure Boot if it interferes with winload.efi and re-enables it after finishing, once everything boots fine.
“Winload.efi is missing or contains an error” errors and codes 0xc000000e/0xf/0x428
These messages reveal a problem of BCD/EFI or UEFI/Legacy configuration. Effective solutions include: temporarily disabling Secure Boot, recreate ESP with bcdboot (Route B), execute bootrec (Path A), and repair files with sfc. If you cloned between disks with different IDs, be careful with registry keys and letters: the command bcdboot usually resolves pointers cleanly.
If your computer came from MBR and you are now using GPT/UEFI, do not try to check “Active” the NVMe data partition: that option is disabled in GPT by design. The correct thing to do is to have a ESP valid and configured in UEFI.
From SATA to NVMe: Drivers and Safe Mode Trick
When moving from SATA to NVMe (PCIe), the first boot may fail due to drivers not loadedNVMe manufacturers recommend a simple trick: force a boot in Safe Mode (Windows often suggests this after a boot failure), let it load drivers, and then reboot in normal mode. This usually unlocks the boot of the clone in NVMe without extra steps; it is also useful to review guides for Add a new SSD to Windows 11 when you change interfaces.
If the repair menu doesn't appear automatically, you can force Safe Mode from the recovery environment or with a msconfig prior to cloning (if you are still booting from the source drive) to ensure that the correct drivers are installed on the first attempt on the NVMe.
Re-cloning: When to do it and how to do it right
If the clone was partial or boot partitions are missing, sometimes the fastest way is to reclone correctly with reliable software. Some programs stand out for:
- Smart layout of partitions (auto-adjustment for disks of different sizes).
- Sector-by-sector cloning when an exact replica is needed.
- Option of resize partitions (auto, as source or manual).
- bookmark “destination is SSD” to align 4K and optimize performance.
- Ability to deal with bad sectors.
If you choose to reclone, connect the destination internally (SATA/M.2), enable the option to optimization for SSD, check that it also copies the ESP/MSR or the System Reserved (in MBR), and when finished put NVMe first in BIOSIf your case is MBR→GPT, don't force merges: decide UEFI + GPT or Legacy + MBR before cloning. To better understand the differences in format and performance, see our guide on SSD drives.
Guided repairs with partitioning tools
If you do not have a Windows USB, there are partition managers that allow you to create one. WinPE medium to boot and act on the disk: mark partitions, rebuild MBR, etc. The function “Rebuild the MBR” rewrites the boot record and may resolve certain legacy errors. For UEFI/GPT, the key is to make sure there is a valid EFI and use bcdboot to populate it.
Some managers also allow, from WinPE, mark as Active the system partition in MBR (remember: does not apply to GPT) and leave the device ready for the Legacy firmware to find it without problems.
Clean installation: the safest way when everything gets tangled up
There are cases where cloning is more complicated than expected (for example, dependencies on a manager on another disk, poorly planned MBR→GPT jumps, or a badly affected BCD). If you prefer the quick and clean way, create a Official installation USB, disconnect all disks except the NVMe, put the plate on UEFI, delete partitions in the installer and let Windows create your own (including EFI). Then you reconnect the other drives and copy your data.
On modern computers, a clean NVMe install is what gives the best performance. Some users, after cloning, noticed that the M.2 was not working smoothly and When moving to Windows 11, performance improved. noticeably in NVMe. It's an option worth considering if you're already determined to upgrade.
As you can see, the solution depends on your starting point: whether you came from MBR/Legacy or GPT/UEFI, whether cloning copied the EFI, whether there is a manager on another disk, or whether you are missing NVMe drivers. With the paths bootrec, bcdboot, the correct UEFI/Legacy setting and the Safe Mode trick, most cloned NVMes come back to life. If not, a careful re-cloning or a clean installation leaves your computer smooth and without dependencies on the old disk.

Editor specialized in technology and internet issues with more than ten years of experience in different digital media. I have worked as an editor and content creator for e-commerce, communication, online marketing and advertising companies. I have also written on economics, finance and other sectors websites. My work is also my passion. Now, through my articles in Tecnobits, I try to explore all the news and new opportunities that the world of technology offers us every day to improve our lives.