- MSI mode replaces classic IRQs with message interrupts, reducing latency and improving GPU response when well supported.
- MSI's Memory Extension Mode optimizes DDR5 by lowering latency by up to around 15% and improving bandwidth and FPS without complex manual overclocking.
- The combination of MSI Mode, XMP/EXPO, G-SYNC, NVIDIA Reflex, a well-configured VSYNC, and Windows Game Mode noticeably reduces latency in games.
- All these settings depend on the hardware, BIOS, and drivers, so it's best to test changes gradually and revert them if they affect stability.

If you're worried about latency in competitive games And have you heard of MSI Mode (Memory Extension Mode) With a thousand strange BIOS and driver settings, it's normal to feel a bit lost. The world of IRQ interrupts, XMP profiles, G-SYNC, VSYNC, and other acronyms might seem like gibberish, but behind it all are very real improvements in smoothness, micro-stuttering, and FPS.
In this article we're going to calmly break down exactly what it is. MSI mode to reduce latencyThis explains how it's activated on the GPU, what MSI's Memory Extension Mode offers on modern Intel motherboards, and how it combines with other NVIDIA and Windows technologies to shave milliseconds off response times. Everything is explained in Castilian Spanish, with a practical approach, but without leaving out any important technical details.
What is MSI mode and why does it affect latency?
In a traditional PC, many hardware interrupts are handled by shared IRQ linesThis means that multiple devices may be connected to the same interrupt line. This can not only lead to increased latency but also stability issues when many components compete to notify the CPU simultaneously.
The origin of the problem lies in the number of physical break lines The number of IRQs on a system is limited, so you can't assign a unique IRQ to each device without quickly exhausting them. Furthermore, on the classic PCI bus, devices are usually grouped on a single lane, making it difficult to prioritize and clearly separate each one.
To resolve this situation, a more modern mechanism was introduced called MSI (Message Signaled Interrupts)which first appeared in the PCI 2.2 standard. Instead of relying on a physical line, the device sends a “signal” by writing to a specific memory address, which generates the interrupt and allows Windows to call the Interrupt Service Routine (ISR) with the message content and delivery address.
With this system, a single device can send up to 32 different messagesEach component carries a different payload, depending on the type of event. This opens the door to better concurrency management and reduced latency because you're no longer chained to a single IRQ shared with other noisy components.
Although MSI has been part of the PCI standard for years, it remains a feature optional and poorly documentedespecially in desktop environments. It's more common on servers and workstations, but modern GPUs and many high-performance devices already fully support it, and Windows has supported this system for several versions.
The disadvantage is that, due to the scarcity of official documentation and almost no benchmarks comparing classic IRQs versus MSI It's difficult to find reliable figures systematically. Most available tests are from enthusiastic users comparing before and after on their own systems, but even so, the practical results are often quite revealing.
How to enable MSI mode for the GPU with NVcleanstall
One of the easiest ways to enable MSI mode on NVIDIA GPUs is by NVcleanstall (also known as NVcleaneinstall), a TechPowerUp tool that allows you to install custom drivers by reducing bloatware and enabling advanced options.
First, download NVcleanstall from the official TechPowerUp website and run the application on your system. When you start the wizard, you will be able to Select the NVIDIA driver version that you want to use, and then uncheck all the components and services that you are not interested in (telemetry, GeForce Experience if you don't want it, etc.), leaving a much cleaner installation.
Within the process, you will find a section on “Advanced settings”On that screen, you should select the "Interrupts with Message Signaling" option to activate MSI mode on compatible devices, including the GPU. This interface also allows you to adjust other advanced driver parameters to suit your preferences.
Regarding the processor, the usual thing is Leave the core selection at the default setting.And it is recommended to set the GPU priority to "High" if the tool allows it, so that the system gives greater weight to interrupts related to rendering.
Once you have everything set up, it's important to click on the option to “Rebuild signature” of the controllerThis generates a signed driver package based on your chosen configuration. You can then proceed to the next step and export the modified driver to a temporary folder for easy access.
The final step consists of install the custom driver that you just generated. During installation, Windows may display warnings indicating that the driver is not signed by NVIDIA or that it is not a "recognized" driver; here you have to accept and indicate that you want to continue anyway, since you know it comes from NVcleanstall.
After completing the process and restarting, the GPU should be using MSI mode instead of shared IRQProvided the hardware and driver support it correctly. From there, you can check in Device Manager or with specialized utilities whether the change has been applied effectively.
Alternative: Enable MSI using the MSI_util_v3 tool
Another fairly popular way to activate MSI mode is through the small utility MSI_util_v3, an independent tool that allows you to check which devices support MSI and change their interrupt mode directly from a graphical interface.
This program is usually distributed in a downloadable ZIP file, and to ensure its integrity, many users share it. MD5 hash of the fileIn one of the most discussed packages, the published MD5 hash is C08D7AE2FFF3052FD801F6BF33831D08, which serves to verify that the file has not been modified if you decide to compare it with a checksum tool.
To use MSI_util_v3, it is recommended to run it as administratorOtherwise, you won't be able to apply changes to the system devices. Once open, you'll see a list of all components that can work with message interrupts or the traditional IRQ mode.
In that list you must locate your graphic cardIt will usually be identified as an NVIDIA or AMD device depending on the GPU model. If the utility indicates that it is compatible with MSI, you can check a box or change the mode to enable it.
It is advisable to establish the GPU priority set to “High” When you enable MSI, the system will treat it as a critical device in terms of interrupts and prevent it from being overshadowed by other components that are less important for gaming performance.
After applying the changes in MSI_util_v3, you will need to restart the computer for the new interrupt configuration to take effect. From that point on, the GPU should start working in MSI mode if everything is correctly supported at the hardware and driver level.
It's worth remembering that, due to how NVIDIA handles updates, every time you install a new driver You may need to repeat the process and reactivate MSI with the tool, as some settings are reset with version changes.
Effects of MSI mode on CPU and GPU usage and stability
By using interrupts with message signaling, the CPU no longer has to be querying the GPU in fixed cycles Instead of being so rigid, it receives more direct and efficient notifications when the device needs attention. This can result in lower CPU usage under certain workloads.
On the other hand, by improving communication and workflow, the GPU can ask for new instructions as soon as you finish your taskInstead of waiting for the next periodic CPU check, this, in many scenarios, increases the effective utilization of the GPU and reduces idle time, resulting in higher FPS or a more stable experience.
However, there is also a risk that some devices They don't fully implement MSI or have poorly polished driversIn such cases, forcing MSI can cause strange behavior, general instability, crashes, or even systems that fail to boot correctly if the affected device is critical.
For this reason, enabling MSI mode is essential. only on devices that the tool marks as compatible and with good support. If you notice crashes, blue screens, loss of connectivity, or any other unusual failures after changing the interrupt mode of a specific component, the wisest course of action is to revert the setting, repair, or restore the BIOS if necessary and return to classic IRQ mode.
MSI's Memory Extension Mode: less RAM latency, more gaming performance
In addition to working with MSI on interrupts, MSI has developed in its modern motherboards for intel A feature called Memory Extension Mode, whose objective is to squeeze the most out of DDR5 memory by reducing its latency and improving bandwidth with a semi-automatic configuration.
On AMD Ryzen 7000 platforms, DDR5 memory is mandatory, while on Intel you can still use DDR4 in some cases, although The recommendation is to opt for DDR5 to get the most out of the new CPUs. Within MSI's catalog, the 700 series motherboards (LGA1700 socket) include this Memory Extension Mode option to optimize RAM performance.
When choosing RAM, you'll find DDR5 modules at highly varied frequencies and latenciesFor example, DDR5 5200 MHz CL40 versus DDR5 6400 MHz CL32. On paper, the second kit is clearly faster, but to get it to work at those specifications you have to activate the XMP profile (on Intel) or EXPO (on AMD); otherwise, the memory stays at the standard base frequency.
Whenever memory operates above the standard JEDEC frequency, it is actually running at an automatic overclockIntel XMP and AMD EXPO profiles are basically predefined overclocking configurations that quickly apply those voltages, frequencies, and latencies, although they usually leave plenty of room for improvement if you're willing to adjust everything manually.
The problem is that the manual RAM overclocking It's a long and somewhat tedious process: you have to tweak timings, test stability with tools like Memtest, AIDA64, etc., and it can take hours or days to find the sweet spot. That's why many people stick with XMP/EXPO and don't go any further.
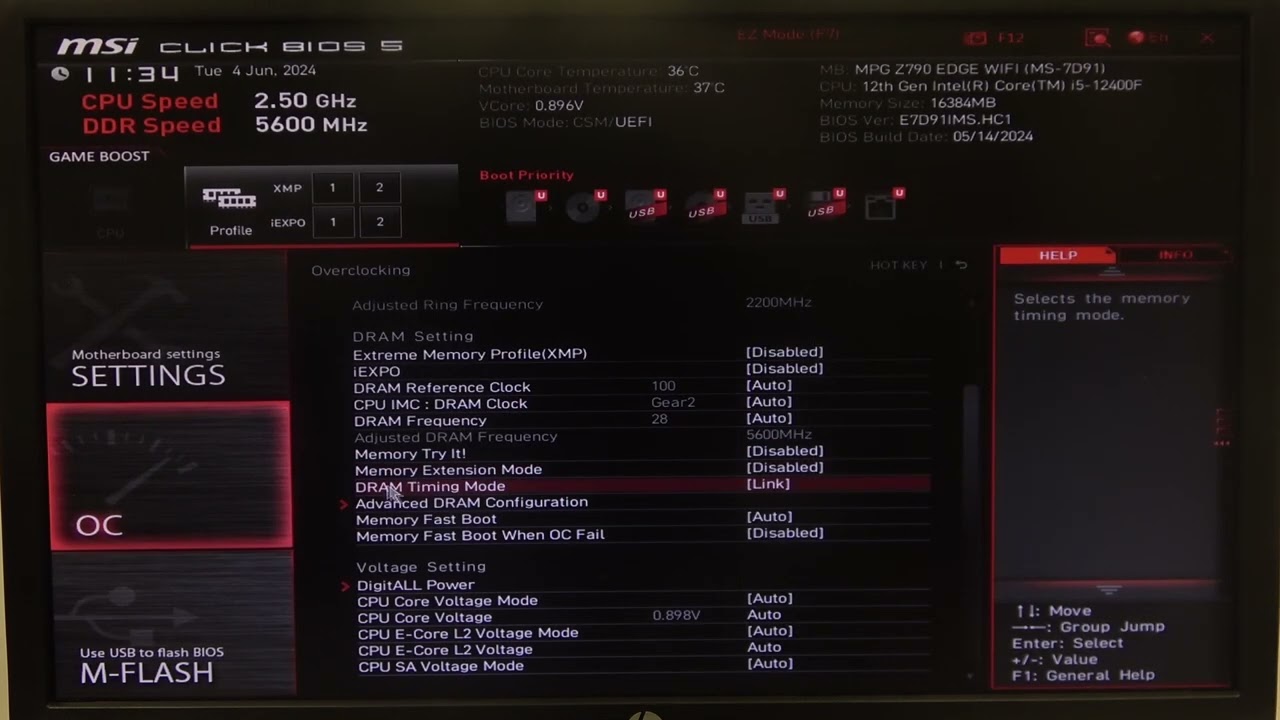
MSI's 700 series motherboards offer an intermediate solution with Memory Extension Mode, which applies a series of additional optimizations to the memory, keeping the primary timings intact in many cases, but adjusting other parameters to reduce latency and improve performance without so much complication.
Within the BIOS, this mode typically offers three main profiles: Performance, Benchmark and MemtestIn MSI's internal tests, using DDR5 at 7600 MHz and running Memory Extension Mode along with Memtest in BIOS, latency was reduced by about 12%, going from about 62,3 ns to about 54,7 ns in AIDA64.

More bandwidth and FPS with Memory Extension Mode and Memory Try It!
In addition to lowering latency, enabling Memory Extension Mode can also increase effective bandwidth of the memory. In tests with AIDA64, an increase of approximately 6% in reading and 23% in writing has been observed, very respectable figures considering that the most visible primary timings are not touched (for example, CL 36-45-45-122 is maintained in certain kits).
Bringing this to real-world gaming, MSI has shown that with Memory Extension Mode in Performance Mode In some titles like Shadow of the Tomb Raider, you can achieve up to 6% more FPS, always using a high-end GPU like an RTX 4090 and maximum graphics settings at 1080p to force the CPU and memory bottleneck.
In other games, the winnings are usually between a 2% and a 5% improvementIt might not seem spectacular, but for an option you simply enable in the BIOS without going into deep manual overclocking, it's pretty good. It's "free FPS" in exchange for a simple and relatively safe adjustment.
Along with Memory Extension Mode, MSI motherboards also include the function Memory Try It!which offers more than 50 overclocking profiles for RAM. Basically, you select one of these presets in the BIOS and the motherboard attempts to apply that configuration automatically without you having to manually adjust each timing.
By combining Memory Extension Mode with Memory Try It!, it is possible to find a point where It reduces latency, increases the effective frequency, and maintains good stability.This allows you to achieve measurable performance increases without too much hassle. However, there's always a risk that a particular profile might not be stable with your memory kit, requiring adjustments or a downgrade.
Memory Extension Mode on the new Intel Core Ultra and 800 series platform
With the arrival of the Intel Core Ultra 200S And with the 800 series motherboards, MSI has once again focused on memory latency. Some Intel executives have acknowledged that, in games, the performance of these processors doesn't always live up to expectations compared to previous generations, and problems related to both BIOS and Windows have been identified.
MSI has announced that its Memory Extension Mode This new platform can significantly reduce memory latency, which in turn directly impacts FPS and responsiveness in games. Intel mentioned a typical latency of around 80 ns, but depending on the configuration, it could exceed 180 ns, which severely impacts performance.
In tests published by MSI, using DDR5 memory at 7200 MT/s CL36The system initially showed a latency of 84,1 ns in AIDA64. Activating Memory Extension Mode reduced this figure to 74,2 ns. With DDR5 modules at 8200 MT/s CL40, the starting latency was 86,5 ns, and after activating the mode, the latency was reduced to 72,9 ns.
Translated into percentages, with memory at 7200 MT/s, a latency reduction of around 11,77%While with the RAM at 8200 MT/s, the reduction reached approximately 15,73%. This is a significant decrease, especially in scenarios where the CPU is severely limited by memory access.
When moving from synthetic benchmarks to real-world games, MSI has shown graphs in which, with Intel XMP + Memory Extension Mode enabledDemanding titles like Cyberpunk 2077 experience performance increases of up to 21% at 1080p, keeping the same RTX 4090 GPU and testing with both DDR5 7200 MT/s and 8200 MT/s.
More generally, if you already have the XMP profile enabled, you'll see average improvements in games of between 6% and 14%If you don't have XMP enabled and combine both (XMP + Memory Extension), the gains can reach the 21% mentioned in some specific scenarios. Furthermore, it's noted that this mode also involves a kind of automatic CPU overclock, which helps to squeeze out a few more frames.
These tests have been carried out with a Intel Core Ultra 9 285K, an MSI MEG Z890 motherboard, an RTX 4090 SUPRIM X, and DDR5 modules from brands like GALAX (7200 MT/s) and G.SKILL (8200 MT/s), running Windows 11 24H2. It is important to emphasize that Memory Extension Mode, in this context, is a exclusive feature of MSI motherboards for Intel 800 series chipsetsand it is expected that other manufacturers will implement similar technologies under different trade names.
As always, some basic points need to be kept in mind: the Final performance depends on the hardware and configurationThe results with an RTX 4090 cannot be directly extrapolated to more modest GPUs, and since it is a form of CPU and memory overclocking, stability varies from one computer to another.
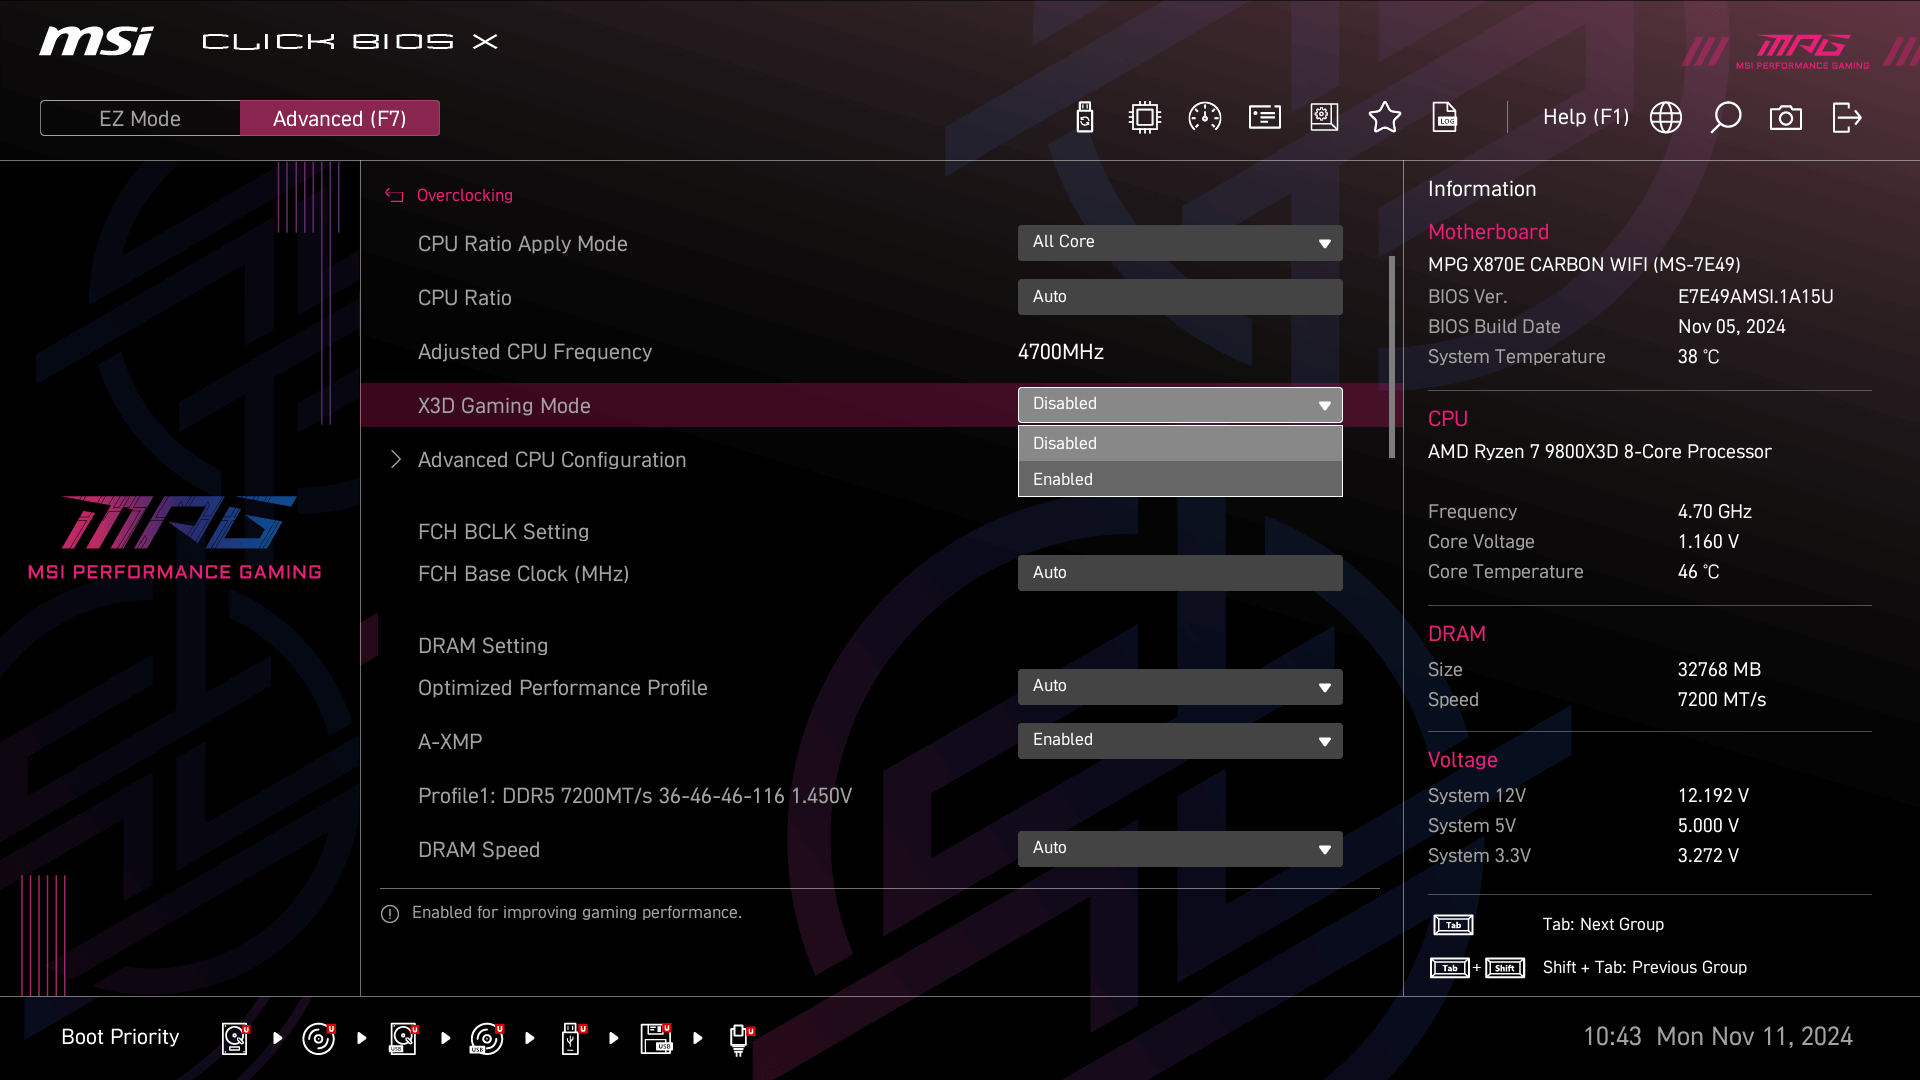
To activate Memory Extension Mode on these modern motherboards, MSI has introduced the new Click BIOS Xwith a more user-friendly interface. The typical procedure involves entering the BIOS (EZ mode by default), pressing F7 to switch to Advanced mode, and locating the Memory Extension option in the Overclocking section; if you have questions about other settings, consult how the CSM in BIOSFrom there you can activate the mode and choose the appropriate profile for your memory.
VSYNC, G-SYNC, NVIDIA Reflex and other settings to reduce latency
Besides playing with MSI and memory, there are several Software settings that greatly influence input latencyOne of the best known is VSYNC, which synchronizes the FPS with the monitor's refresh rate to avoid tearing, but in return can add noticeable lag.
If you don't want to use VSYNC globally in the NVIDIA Control Panel, it's also advisable disable it within each gameJust in case it's forcing it internally. This way you avoid unnecessarily limiting FPS and artificially reducing input lag when it's not needed.
Things change if you use a monitor with variable update rate (VRR), such as those compatible with NVIDIA G-SYNC. In these cases, you can combine G-SYNC with certain VSYNC and NVIDIA Reflex configurations to get the best of both worlds: no tearing and very low latency.
For G-SYNC users who want to avoid fragmentation, a common strategy is to maintain VSYNC enabled along with NVIDIA Reflex or NVIDIA's Ultra Low Latency mode set to "Ultra". This way, the system automatically limits the FPS below the monitor's refresh rate, eliminates screen tearing, and avoids the backpressure typical of pure VSYNC, keeping latency relatively low as long as the limit is slightly below the panel's refresh rate.
However, this configuration usually results in slightly more latency which is better than simply leaving the FPS uncapped with NVIDIA Reflex enabled. In return, you gain stability in the visual experience, which for many gamers compensates for that slight increase in input lag.
It's important to note that the VSYNC option in the NVIDIA Control Panel only works in exclusive full-screen appsFurthermore, many laptops with hybrid graphics systems (MS Hybrid) do not support this VSYNC feature from the panel, so if you want to combine G-SYNC + VSYNC + Reflex on these types of computers you will have to use the VSYNC integrated into the game itself.
Taken together, the use of MSI interrupts for the GPU, the optimization of DDR5 memory through Memory Extension Mode and XMP profiles, the careful configuration of G-SYNC, VSYNC and NVIDIA Reflex, as well as taking advantage of Windows Game Mode and the automatic tuning features of GeForce Experience, form a chain of small adjustments that, when applied consistently, allow you to get the most out of the hardware and achieve a smoother gaming experience, with fewer micro-stutters and a much more immediate response to your actions.

Editor specialized in technology and internet issues with more than ten years of experience in different digital media. I have worked as an editor and content creator for e-commerce, communication, online marketing and advertising companies. I have also written on economics, finance and other sectors websites. My work is also my passion. Now, through my articles in Tecnobits, I try to explore all the news and new opportunities that the world of technology offers us every day to improve our lives.